Christmas cakes come in all shapes, flavors, and styles, making them a fun and creative highlight of the holiday season. Whether you’re a fan of traditional fruitcakes or prefer something a bit more modern, there are endless ways to make your cake the centerpiece of festive celebrations. From decorating tips to flavor combinations, let’s jump into some tasty ideas that will make your holiday baking a piece of cake!
To really bring your Christmas cake to life, start by gathering a few essential Christmas cake decorating supplies — from shimmering edible glitter to festive cake toppers and piping sets. With the right tools, even simple designs can look stunning and professional, adding that extra sparkle to your holiday table.
Cranberry Orange Bundt Cake
Contents
- Cranberry Orange Bundt Cake
- Spiced Gingerbread Cake
- Rich Chocolate Yule Log
- Eggnog Cheesecake
- Peppermint Mocha Cake
- Classic Fruitcake with Nuts and Dried Fruits
- Red Velvet Christmas Cake
- Almond Joy Cake
- Lemon Drizzle Christmas Cake
- Pecan Pie Cake
- Coconut Snowball Cake
- Carrot Cake with Cream Cheese Frosting
- Chocolate Peppermint Layer Cake
- Vanilla Bean Cake with Berry Compote
- Marble Cake with Chocolate Ganache
- Fruit and Nut Chocolate Cake
- Cinnamon Roll Cake
- Chocolate Chip Cookie Cake
- Maple Pecan Cake
- S’mores Christmas Cake
- Raspberry Almond Cake
- Gingerbread House Cake
- Nutmeg Spice Cake with Cream Cheese Frosting
- Chocolate Hazelnut Cake
- Tiramisu Christmas Cake
- Peanut Butter Cup Cake
- Pumpkin Spice Cake
- Winter Berry Cake
- Honey Almond Cake
- Chocolate Mint Christmas Cake Ideas
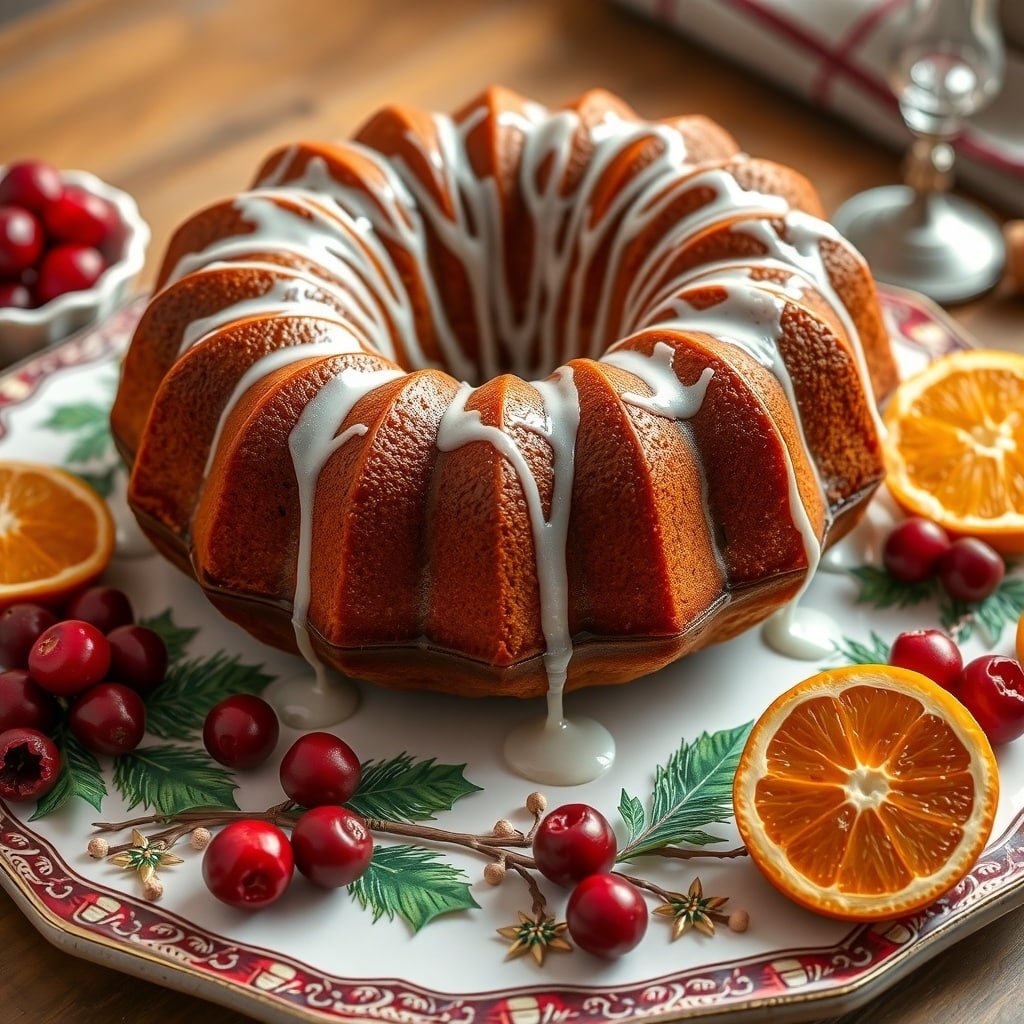
This Cranberry Orange Bundt Cake is a festive treat that captures the spirit of the holiday season. The rich, moist cake is infused with the bright flavors of orange and tart cranberries, making it a perfect addition to your Christmas cake designs. The beautiful bundt shape adds elegance to your dessert table.
The cake is topped with a simple glaze that enhances its flavor without overpowering it. The combination of sweet and tart makes every bite delightful. Plus, it looks stunning when garnished with fresh cranberries and orange slices, which adds a pop of color to your holiday spread.
Making this cake is straightforward, and it’s a great way to impress your family and friends. For best results, use a quality bundt cake pan to ensure an even bake and beautifully defined shape. Gather your ingredients, and let’s get baking!
Ingredients
- 2 cups all-purpose flour
- 1 1/2 teaspoons baking powder
- 1/2 teaspoon baking soda
- 1/2 teaspoon salt
- 1 cup unsalted butter, softened
- 1 cup granulated sugar
- 1/2 cup brown sugar, packed
- 4 large eggs
- 1 teaspoon vanilla extract
- 1 tablespoon orange zest
- 1/2 cup fresh orange juice
- 1 1/2 cups fresh cranberries, chopped
- 1 cup powdered sugar (for glaze)
- 2 tablespoons orange juice (for glaze)
Instructions
- Preheat your oven to 350°F (175°C). Grease and flour a bundt pan.
- In a bowl, whisk together flour, baking powder, baking soda, and salt. Set aside.
- In a large mixing bowl, cream the softened butter, granulated sugar, and brown sugar until light and fluffy.
- Add eggs one at a time, mixing well after each addition. Stir in vanilla extract, orange zest, and orange juice.
- Gradually add the dry ingredients to the wet mixture, mixing until just combined. Fold in the chopped cranberries.
- Pour the batter into the prepared bundt pan and smooth the top. Bake for 50-60 minutes, or until a toothpick inserted comes out clean.
- Let the cake cool in the pan for about 15 minutes, then invert onto a wire rack to cool completely.
- For the glaze, mix powdered sugar with orange juice until smooth. Drizzle over the cooled cake before serving.
Spiced Gingerbread Cake
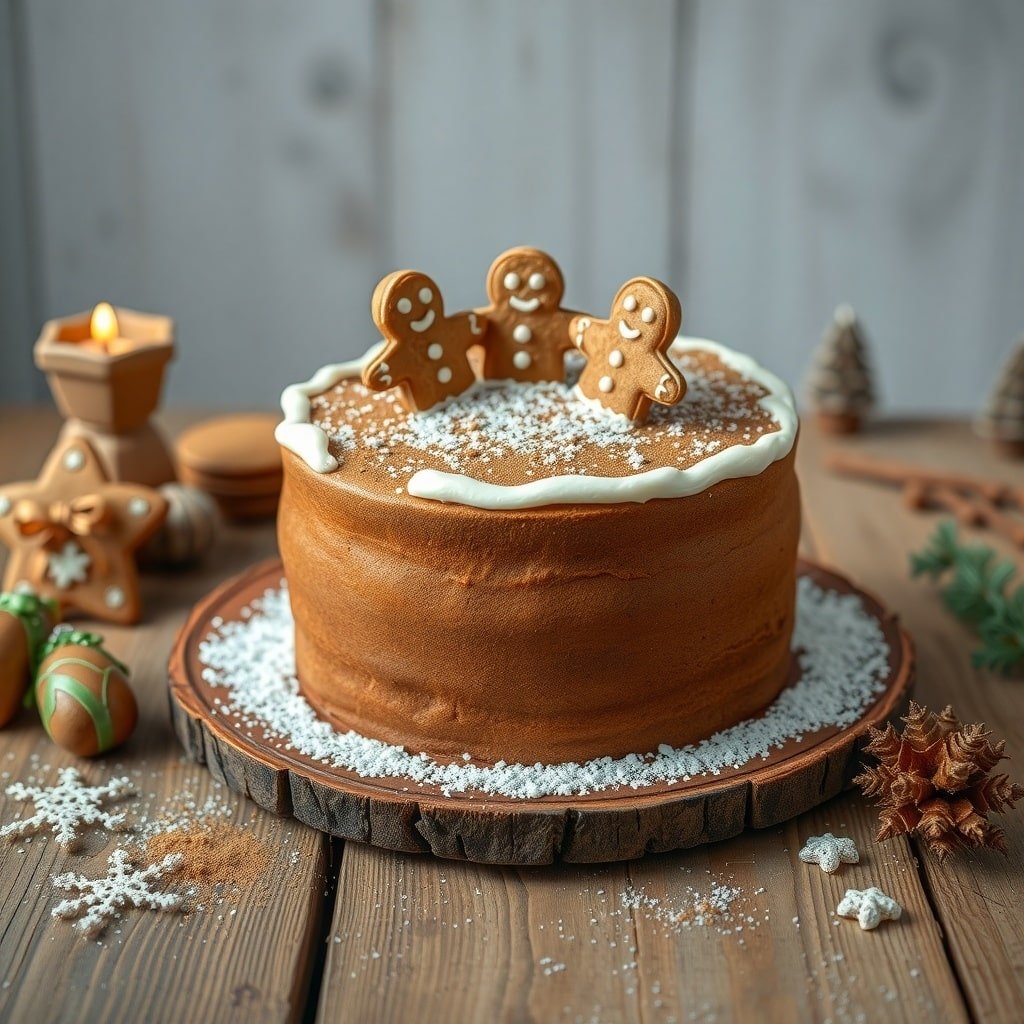
Spiced gingerbread cake is a delightful treat that captures the essence of Christmas. This cake is rich with warm spices like ginger, cinnamon, and nutmeg, making it a perfect addition to your holiday dessert table. The image shows a beautifully decorated cake topped with cheerful gingerbread men, adding a fun touch to the festive spirit.
The cake itself is moist and flavorful, often paired with a creamy frosting that complements its spiced goodness. You can also see some lovely decorations around the cake, like snowflakes and holiday ornaments, enhancing its festive appeal. This cake not only tastes great but also looks stunning, making it a highlight of any Christmas celebration.
Ingredients
- 2 1/2 cups all-purpose flour
- 1 teaspoon baking soda
- 1 teaspoon baking powder
- 1 teaspoon ground ginger
- 1 teaspoon ground cinnamon
- 1/2 teaspoon ground nutmeg
- 1/4 teaspoon ground cloves
- 1/2 teaspoon salt
- 1 cup unsalted butter, softened
- 1 cup brown sugar, packed
- 1/2 cup granulated sugar
- 4 large eggs
- 1 cup molasses
- 1/2 cup hot water
Instructions
- Preheat the oven to 350°F (175°C). Grease and flour two 9-inch round cake pans.
- In a bowl, whisk together flour, baking soda, baking powder, ginger, cinnamon, nutmeg, cloves, and salt.
- In a large mixing bowl, cream together the butter, brown sugar, and granulated sugar until light and fluffy.
- Add the eggs one at a time, mixing well after each addition. Stir in the molasses.
- Gradually add the dry ingredients to the wet mixture, alternating with hot water. Mix until just combined.
- Pour the batter evenly into the prepared pans. Bake for 30-35 minutes, or until a toothpick inserted in the center comes out clean.
- Let the cakes cool in the pans for 10 minutes, then transfer to wire racks to cool completely.
- Once cooled, frost with your favorite cream cheese frosting and decorate with gingerbread men and festive sprinkles.
Rich Chocolate Yule Log
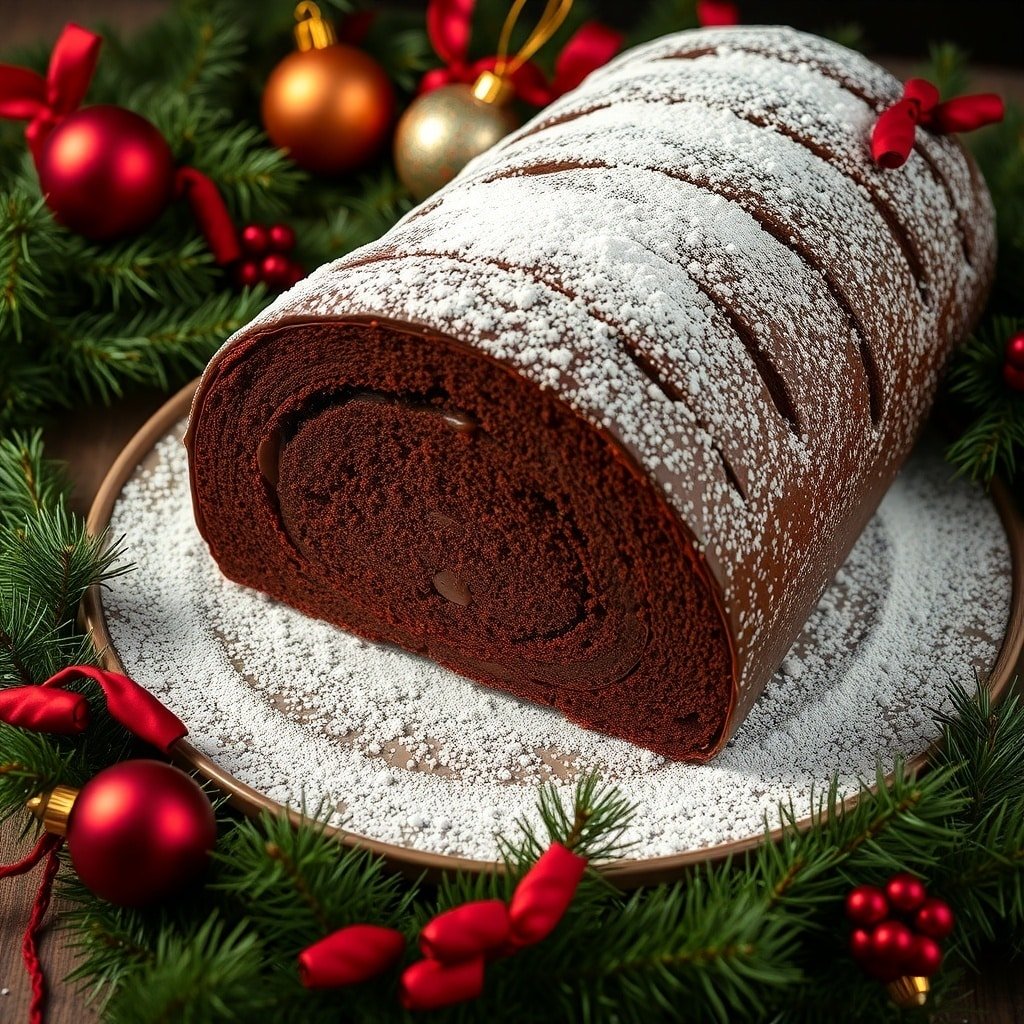
The Rich Chocolate Yule Log is a stunning centerpiece for any holiday table. This classic dessert captures the essence of Christmas with its deep chocolate flavor and festive presentation. The log is often decorated with powdered sugar, resembling freshly fallen snow, and is surrounded by vibrant holiday decorations like red ornaments and green pine branches.
This cake is not just about looks; it’s a delightful combination of light sponge and rich chocolate filling. The rolled shape adds a touch of elegance, making it a favorite among Christmas cake designs. Whether you’re serving it at a family gathering or gifting it to friends, this Yule Log is sure to impress.
Ingredients
- 1 cup all-purpose flour
- 1/2 cup unsweetened cocoa powder
- 1 teaspoon baking powder
- 1/4 teaspoon salt
- 3 large eggs
- 1 cup granulated sugar
- 1 teaspoon vanilla extract
- 1/4 cup unsalted butter, melted
- 1 cup heavy cream
- 1/2 cup powdered sugar
- 1 teaspoon vanilla extract (for filling)
- Powdered sugar for dusting
Instructions
- Preheat the oven to 350°F (175°C). Grease a 15×10-inch jelly roll pan and line it with parchment paper.
- In a bowl, mix flour, cocoa powder, baking powder, and salt. Set aside.
- In another bowl, beat eggs and granulated sugar until thick and pale. Stir in vanilla and melted butter.
- Gradually add the dry ingredients to the egg mixture, folding gently until combined.
- Pour the batter into the prepared pan and spread evenly. Bake for 12-15 minutes, or until the cake springs back when touched.
- Once baked, remove from the oven and let it cool for a few minutes. Carefully roll the cake in the parchment paper, starting from the short end. Let it cool completely.
- For the filling, whip the heavy cream with powdered sugar and vanilla until soft peaks form.
- Unroll the cooled cake and spread the whipped cream evenly over the surface. Roll the cake back up without the parchment paper.
- Transfer the Yule Log to a serving platter. Dust with powdered sugar before serving.
Eggnog Cheesecake
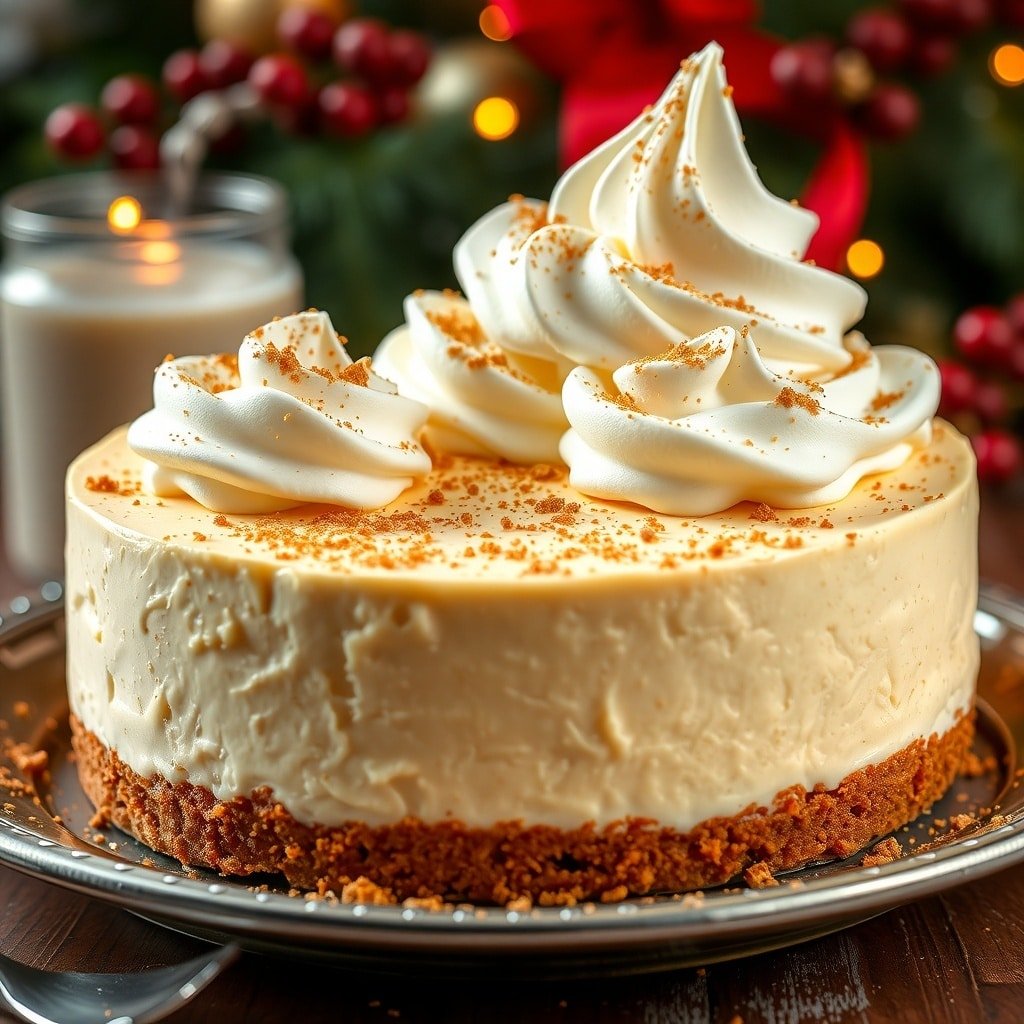
Eggnog cheesecake is a delightful twist on the classic holiday dessert. This creamy cheesecake combines the rich flavors of eggnog with a smooth, velvety texture. The festive season is the perfect time to impress your guests with this unique dessert that captures the essence of Christmas.
The image showcases a beautifully crafted eggnog cheesecake topped with whipped cream and a sprinkle of nutmeg. The golden crust adds a nice contrast to the creamy filling, making it visually appealing. This cake is not just a treat for the taste buds but also a feast for the eyes.
When thinking about Christmas cake designs, this eggnog cheesecake stands out. It’s a wonderful centerpiece for any holiday gathering, bringing warmth and cheer to your table. Serve it alongside a glass of eggnog for a truly festive experience!
Ingredients
- 1 1/2 cups graham cracker crumbs
- 1/2 cup unsalted butter, melted
- 1/4 cup granulated sugar
- 3 (8-ounce) packages cream cheese, softened
- 1 cup granulated sugar
- 1 cup eggnog
- 3 large eggs
- 1 teaspoon vanilla extract
- 1 teaspoon ground nutmeg
- 1/4 teaspoon salt
- Whipped cream for topping
Instructions
- Preheat your oven to 325°F (160°C).
- In a bowl, mix graham cracker crumbs, melted butter, and sugar until combined. Press this mixture into the bottom of a 9-inch springform pan to form the crust.
- In a large mixing bowl, beat the softened cream cheese until smooth. Gradually add sugar and mix until well combined.
- Add eggnog, eggs, vanilla extract, nutmeg, and salt. Mix until smooth and creamy.
- Pour the cheesecake batter over the crust in the springform pan.
- Bake for 50-60 minutes or until the center is set but still slightly jiggly.
- Turn off the oven and let the cheesecake cool in the oven with the door slightly ajar for about an hour.
- Refrigerate for at least 4 hours or overnight before serving.
- Top with whipped cream and a sprinkle of nutmeg before serving.
Peppermint Mocha Cake
The Peppermint Mocha Cake is a delightful treat that brings the flavors of the holiday season right to your table. This cake features rich chocolate layers infused with coffee and peppermint, making it a perfect choice for Christmas gatherings. Topped with fluffy whipped cream and garnished with candy canes, it looks as festive as it tastes.
When you slice into this cake, you’ll find moist layers that are complemented by a creamy filling. The combination of chocolate and peppermint is a classic that many love during the holidays. It’s not just a cake; it’s a centerpiece that will impress your guests and bring smiles all around.
For those looking for unique Christmas cake designs, this Peppermint Mocha Cake stands out with its beautiful layers and festive decorations. It’s a fun way to celebrate the season and share a delicious dessert with family and friends.
Ingredients
- 1 ¾ cups all-purpose flour
- 1 ¾ cups granulated sugar
- ¾ cup unsweetened cocoa powder
- 1 ½ teaspoons baking powder
- 1 ½ teaspoons baking soda
- 1 teaspoon salt
- 2 large eggs
- 1 cup milk
- ½ cup vegetable oil
- 2 teaspoons vanilla extract
- 1 cup boiling water
- 1 cup brewed coffee
- 1 teaspoon peppermint extract
- 2 cups heavy cream
- ¼ cup powdered sugar
- Candy canes for garnish
Instructions
- Preheat your oven to 350°F (175°C). Grease and flour two 9-inch round cake pans.
- In a large bowl, mix flour, sugar, cocoa powder, baking powder, baking soda, and salt.
- Add eggs, milk, oil, and vanilla to the dry ingredients. Beat on medium speed for 2 minutes.
- Stir in boiling water and brewed coffee until well combined. The batter will be thin.
- Pour the batter evenly into the prepared pans. Bake for 30-35 minutes or until a toothpick comes out clean.
- Let the cakes cool in the pans for 10 minutes, then remove and cool completely on wire racks.
- Once cooled, whip the heavy cream with powdered sugar until soft peaks form.
- Place one cake layer on a serving plate. Spread a layer of whipped cream on top, then drizzle with peppermint extract.
- Add the second cake layer and repeat the process. Top with remaining whipped cream and garnish with crushed candy canes.
- Slice and serve your Peppermint Mocha Cake, and enjoy the festive flavors!
Classic Fruitcake with Nuts and Dried Fruits
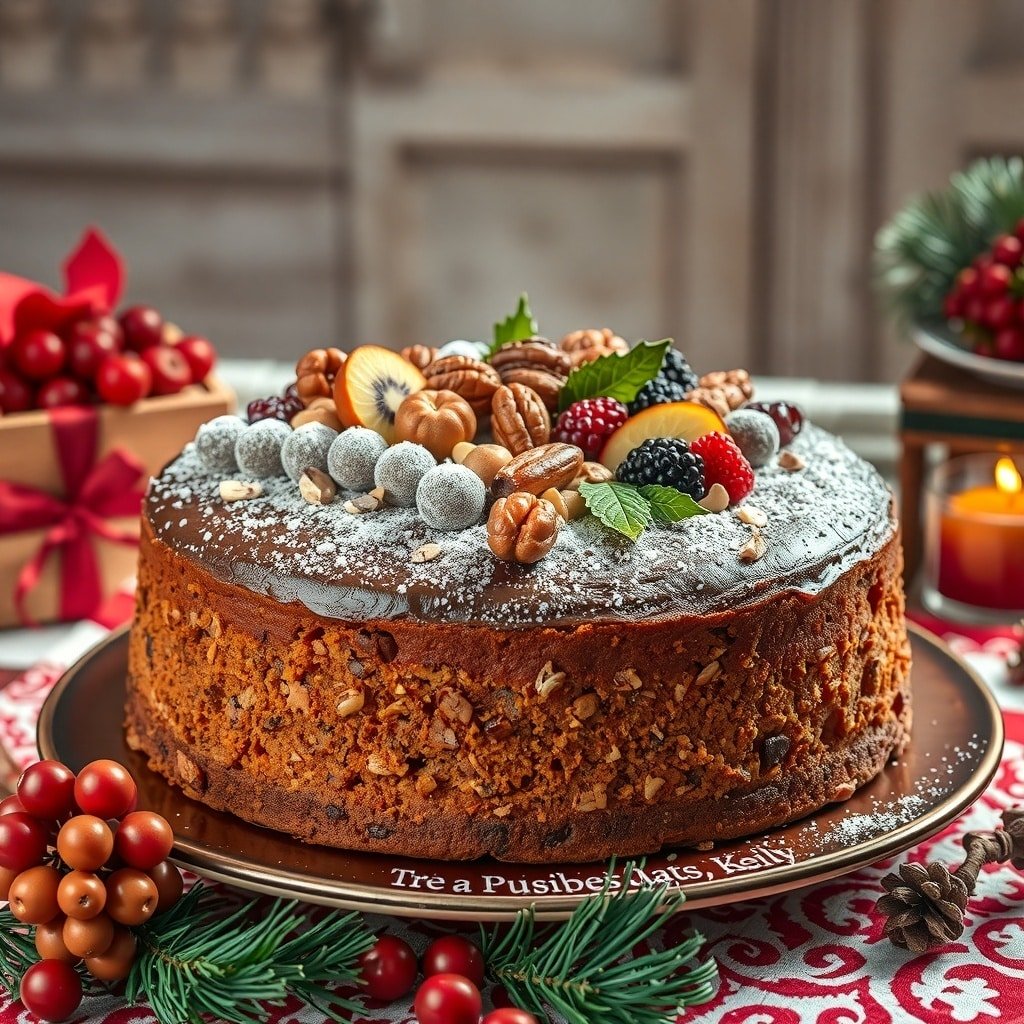
Fruitcake is a timeless choice for Christmas celebrations. This classic version is packed with nuts and dried fruits, making it both hearty and flavorful. The cake is often adorned with a rich chocolate or icing topping, adding a festive touch. In the image, you can see a beautifully decorated fruitcake, topped with an assortment of nuts and colorful dried fruits. The presentation is inviting, perfect for any holiday gathering.
Making a fruitcake is a wonderful way to bring the holiday spirit into your kitchen. It’s not just about the taste; it’s about the memories created while baking. Gather your loved ones, and enjoy the process of mixing and decorating this traditional Christmas cake.
Ingredients
- 2 cups mixed dried fruits (raisins, currants, apricots)
- 1 cup mixed nuts (walnuts, pecans, almonds)
- 1 cup unsalted butter, softened
- 1 cup brown sugar
- 4 large eggs
- 3 cups all-purpose flour
- 1 teaspoon baking powder
- 1 teaspoon ground cinnamon
- 1/2 teaspoon ground nutmeg
- 1/4 teaspoon salt
- 1/2 cup milk
- 1/4 cup brandy or orange juice
- Powdered sugar for dusting
Instructions
- Preheat the oven to 325°F (160°C). Grease and line a round cake pan.
- In a large bowl, cream together the softened butter and brown sugar until light and fluffy. Add the eggs one at a time, mixing well after each addition.
- In another bowl, whisk together the flour, baking powder, cinnamon, nutmeg, and salt.
- Gradually add the dry ingredients to the butter mixture, alternating with the milk and brandy (or orange juice). Mix until just combined.
- Fold in the mixed dried fruits and nuts until evenly distributed.
- Pour the batter into the prepared cake pan and smooth the top. Bake for about 1 hour, or until a toothpick inserted into the center comes out clean.
- Let the cake cool in the pan for 10 minutes, then transfer to a wire rack to cool completely. Dust with powdered sugar before serving.
Red Velvet Christmas Cake
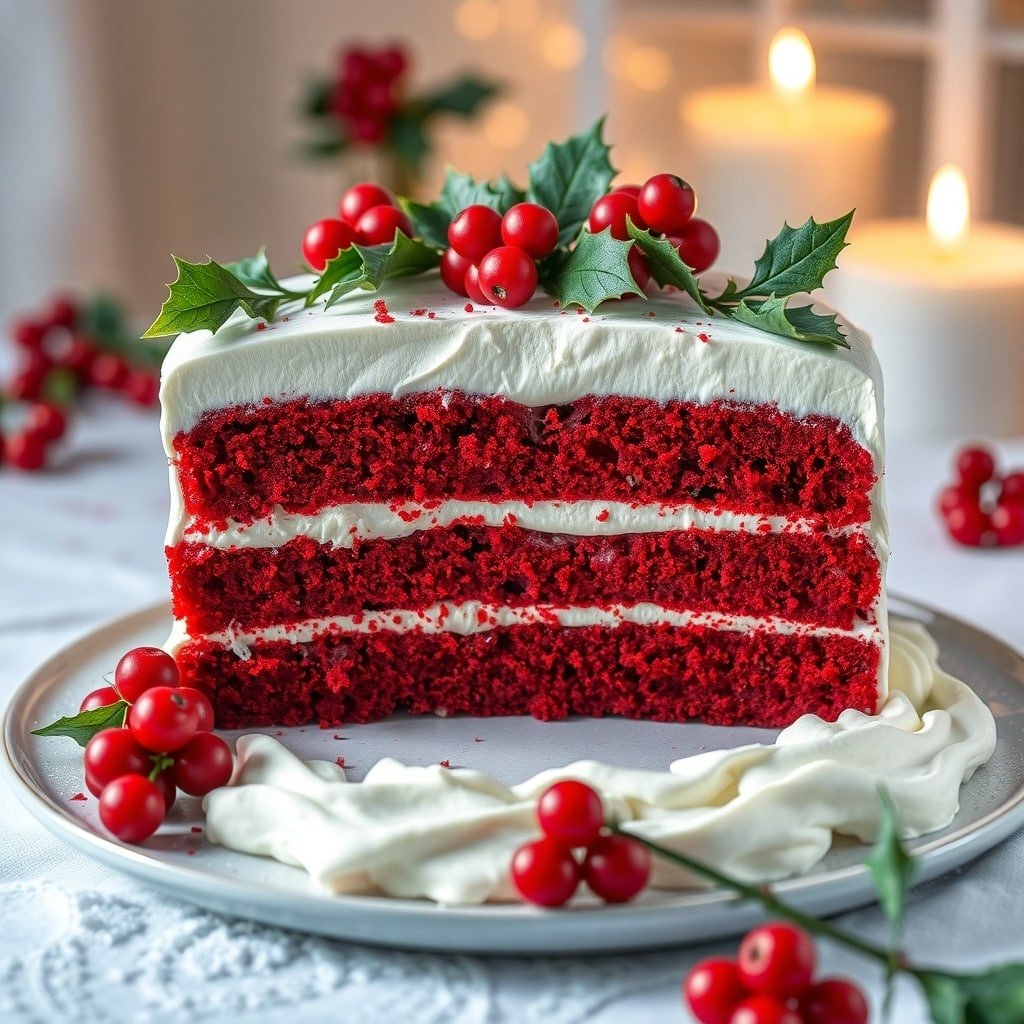
Red Velvet Christmas Cake is a festive treat that brings joy to any holiday gathering. Its vibrant red color and creamy white frosting make it a showstopper on the dessert table. This cake is not just about looks; it’s rich, moist, and has a hint of cocoa that pairs perfectly with the tangy cream cheese frosting.
When it comes to Christmas cake designs, this one stands out. The layers of red velvet are often adorned with seasonal decorations like holly and berries, making it a delightful centerpiece. The combination of flavors and colors captures the spirit of the holiday season.
Making this cake is easier than you might think. With a few simple ingredients, you can whip up a delicious dessert that will impress your family and friends. Let’s get into the recipe!
Ingredients
- 2 ½ cups all-purpose flour
- 1 ½ cups granulated sugar
- 1 teaspoon baking soda
- 1 teaspoon salt
- 1 teaspoon cocoa powder
- 1 ½ cups vegetable oil
- 1 cup buttermilk, room temperature
- 2 large eggs, room temperature
- 2 tablespoons red food coloring
- 1 teaspoon vanilla extract
- 1 teaspoon white vinegar
- 8 oz cream cheese, softened
- ½ cup unsalted butter, softened
- 4 cups powdered sugar
- 1 teaspoon vanilla extract (for frosting)
Instructions
- Preheat your oven to 350°F (175°C). Grease and flour three 9-inch round cake pans.
- In a large bowl, mix flour, sugar, baking soda, salt, and cocoa powder.
- In another bowl, combine oil, buttermilk, eggs, food coloring, vanilla, and vinegar. Mix well.
- Gradually add the wet ingredients to the dry ingredients, mixing until just combined.
- Divide the batter evenly among the prepared pans. Bake for 25-30 minutes or until a toothpick comes out clean.
- Let the cakes cool in the pans for 10 minutes, then transfer to wire racks to cool completely.
- For the frosting, beat cream cheese and butter until smooth. Gradually add powdered sugar and vanilla, mixing until creamy.
- Once the cakes are cool, spread frosting between the layers and over the top and sides of the cake. Decorate with holly and berries if desired.
- Slice and serve your beautiful Red Velvet Christmas Cake!
Almond Joy Cake

The Almond Joy Cake is a delightful twist on the classic candy bar. This cake features layers of rich chocolate, creamy coconut, and crunchy almonds, making it a perfect addition to your holiday dessert table. Its beautiful presentation, topped with toasted almonds and a drizzle of chocolate, is sure to impress your guests.
This cake not only looks stunning, but it also brings together flavors that everyone loves. The combination of chocolate and coconut is a crowd-pleaser, and the almonds add a nice crunch. Whether you’re celebrating with family or hosting a holiday party, this cake is a fantastic choice among Christmas cake designs.
Making this cake is easier than you might think. With a few simple ingredients and steps, you can create a dessert that tastes as good as it looks. Let’s get into the recipe!
Ingredients
- 1 3/4 cups all-purpose flour
- 1 1/2 cups granulated sugar
- 3/4 cup unsweetened cocoa powder
- 1 1/2 teaspoons baking powder
- 1 1/2 teaspoons baking soda
- 1 teaspoon salt
- 2 large eggs
- 1 cup whole milk
- 1/2 cup vegetable oil
- 2 teaspoons vanilla extract
- 1 cup boiling water
- 1 cup shredded coconut
- 1 cup chopped almonds
- 1 cup chocolate frosting
- Extra almonds and coconut for topping
Instructions
- Preheat your oven to 350°F (175°C). Grease and flour two 9-inch round cake pans.
- In a large bowl, mix flour, sugar, cocoa powder, baking powder, baking soda, and salt.
- Add eggs, milk, oil, and vanilla to the dry ingredients. Beat on medium speed for about 2 minutes.
- Stir in boiling water until well combined. The batter will be thin.
- Pour the batter evenly into the prepared pans. Bake for 30-35 minutes or until a toothpick comes out clean.
- Let the cakes cool in the pans for 10 minutes, then remove them from the pans and let them cool completely on a wire rack.
- Once cooled, place one layer on a serving plate. Spread a layer of chocolate frosting on top, then sprinkle with shredded coconut and chopped almonds.
- Top with the second cake layer and frost the top and sides. Decorate with extra almonds and coconut.
- Slice and serve this delicious Almond Joy Cake at your holiday gatherings!
Lemon Drizzle Christmas Cake
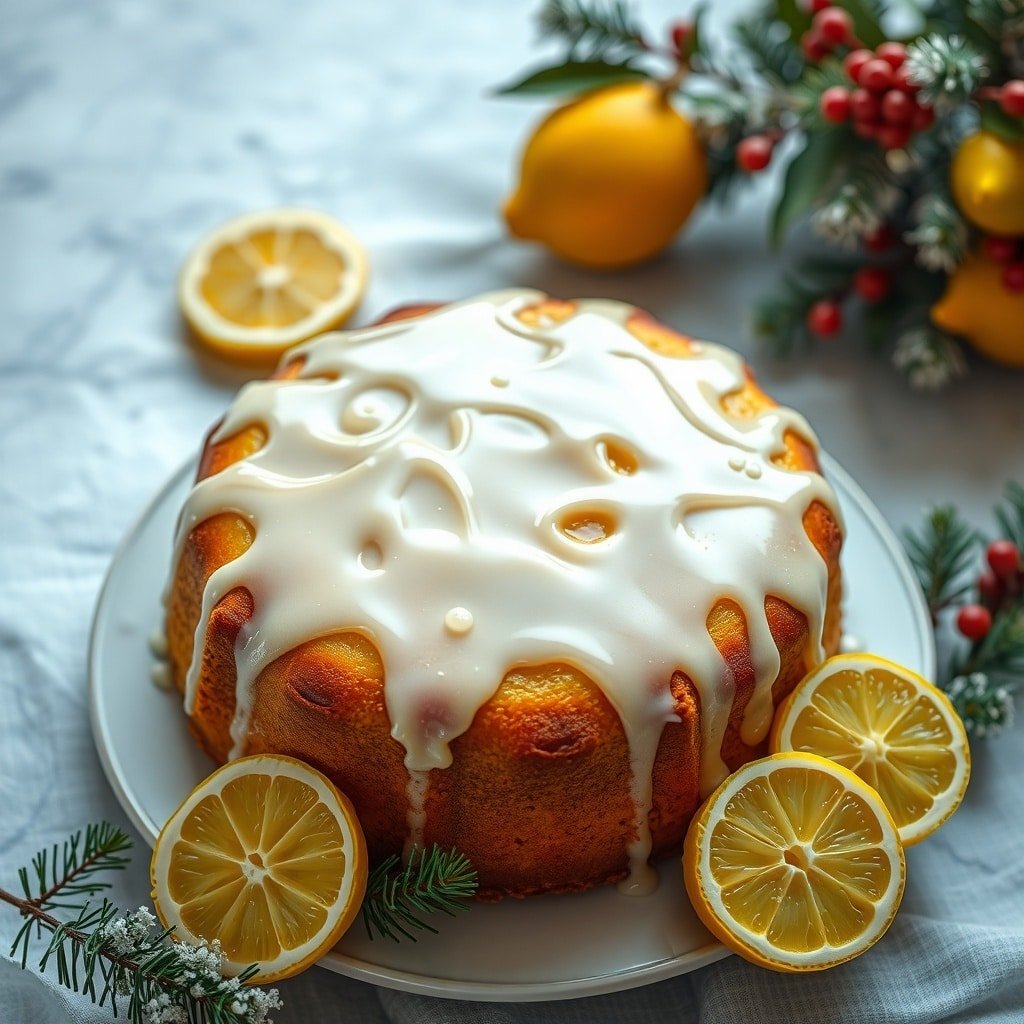
The Lemon Drizzle Christmas Cake is a delightful twist on traditional holiday treats. This cake is bright and zesty, perfect for adding a refreshing touch to your festive table. The smooth, glossy icing drapes over the cake, making it not only tasty but visually appealing too. With fresh lemons and a drizzle of sweet glaze, it’s sure to impress your guests.
To make this cake, gather your ingredients and follow the simple steps. The balance of tart and sweet makes it a favorite among many. Plus, it’s easy to slice and serve, making it a great option for gatherings.
Ingredients
- 1 cup unsalted butter, softened
- 1 cup granulated sugar
- 4 large eggs
- 2 cups all-purpose flour
- 2 teaspoons baking powder
- 1/2 teaspoon salt
- 1/4 cup lemon juice
- Zest of 2 lemons
- 1/2 cup milk
- 1 cup powdered sugar
- 2 tablespoons lemon juice (for glaze)
Instructions
- Preheat your oven to 350°F (175°C). Grease and flour a round cake pan.
- In a large bowl, cream together the softened butter and sugar until light and fluffy.
- Add the eggs one at a time, mixing well after each addition.
- In another bowl, combine the flour, baking powder, and salt. Gradually add this to the butter mixture, alternating with milk and lemon juice. Mix until just combined.
- Fold in the lemon zest for that extra zing.
- Pour the batter into the prepared cake pan and smooth the top. Bake for 30-35 minutes, or until a toothpick comes out clean.
- Let the cake cool in the pan for 10 minutes, then transfer to a wire rack to cool completely.
- For the glaze, mix powdered sugar with lemon juice until smooth. Drizzle over the cooled cake.
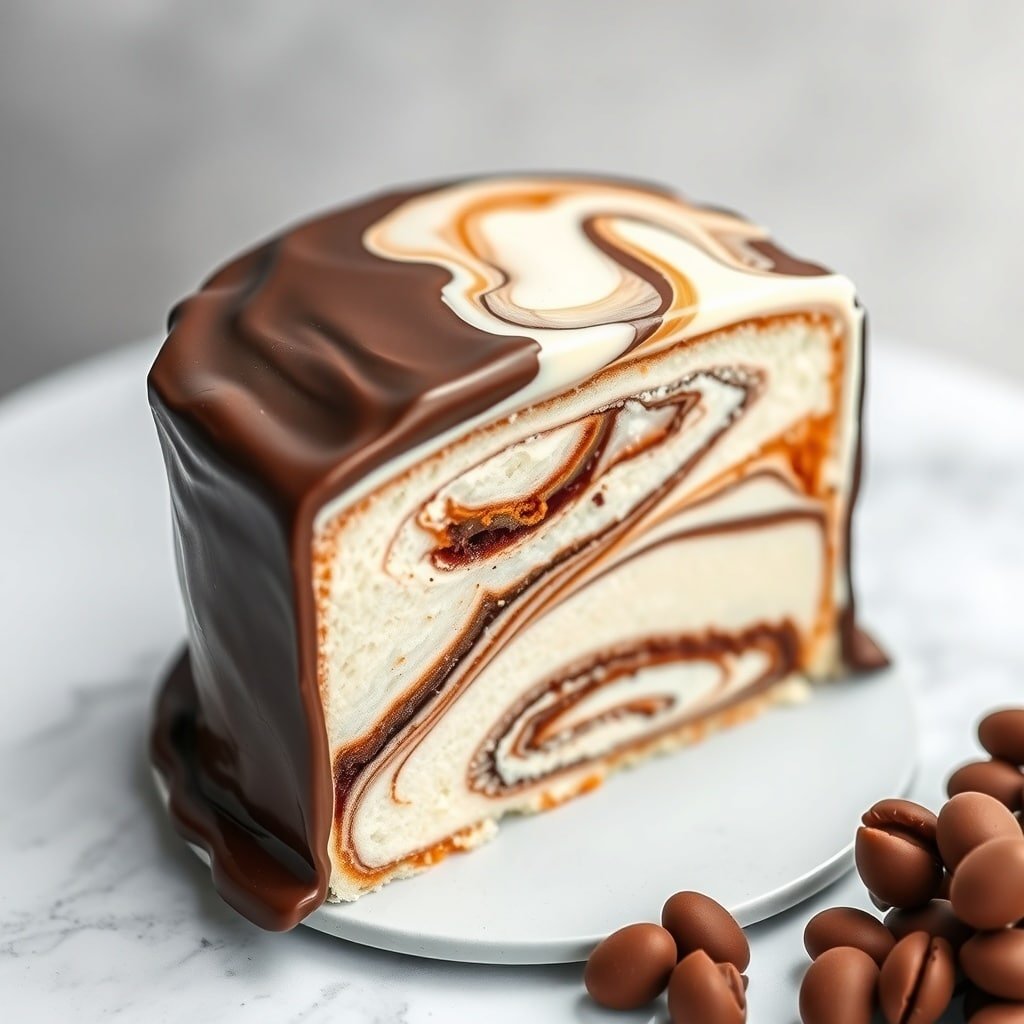
Pecan Pie Cake
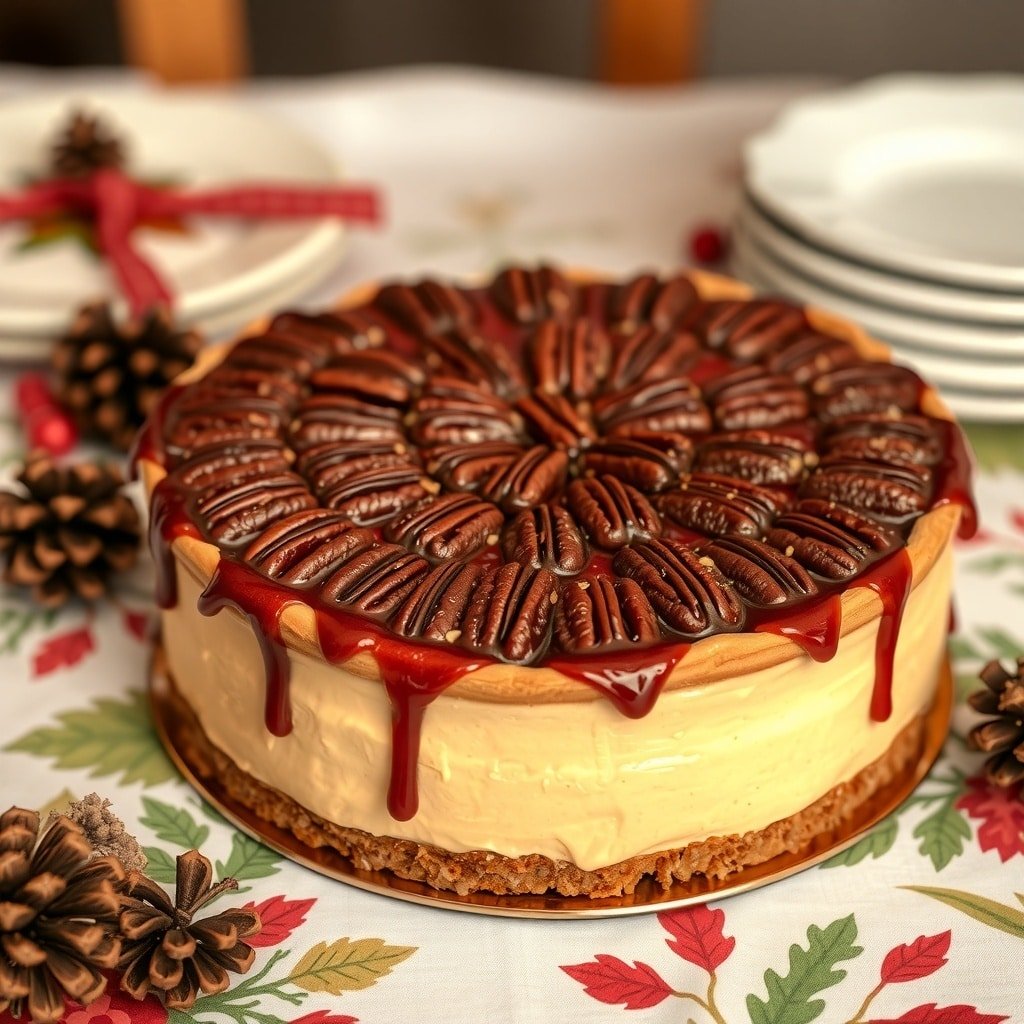
Picture a delightful blend of flavors that captures the essence of the holiday season. The Pecan Pie Cake is a stunning dessert that combines the rich, nutty taste of pecans with the sweet, creamy texture of cake. This cake is not just a treat for the taste buds; it’s also a feast for the eyes. The glossy caramel drizzle and perfectly arranged pecans on top make it a showstopper for any Christmas gathering.
This cake is perfect for those looking for unique Christmas cake designs. It brings a twist to traditional flavors while still feeling festive. Whether you’re hosting a holiday party or simply enjoying a cozy evening at home, this cake will surely impress your guests.
Ready to make your own? Here’s how to whip up this delicious Pecan Pie Cake!
Ingredients
- 1 ½ cups all-purpose flour
- 1 cup granulated sugar
- ½ cup unsalted butter, softened
- 2 large eggs
- 1 teaspoon vanilla extract
- 1 teaspoon baking powder
- ½ teaspoon salt
- 1 cup chopped pecans
- 1 cup caramel sauce
Instructions
- Preheat your oven to 350°F (175°C). Grease and flour a 9-inch round cake pan.
- In a mixing bowl, cream together the softened butter and sugar until light and fluffy. Add in the eggs and vanilla, mixing well.
- In another bowl, whisk together the flour, baking powder, and salt. Gradually add this dry mixture to the wet ingredients, stirring until just combined.
- Fold in the chopped pecans, ensuring they are evenly distributed throughout the batter.
- Pour the batter into the prepared cake pan and smooth the top. Bake for 25-30 minutes or until a toothpick inserted in the center comes out clean.
- Once baked, let the cake cool in the pan for about 10 minutes before transferring it to a wire rack to cool completely.
- Once cooled, drizzle the caramel sauce over the top and arrange additional pecans for decoration.
Coconut Snowball Cake
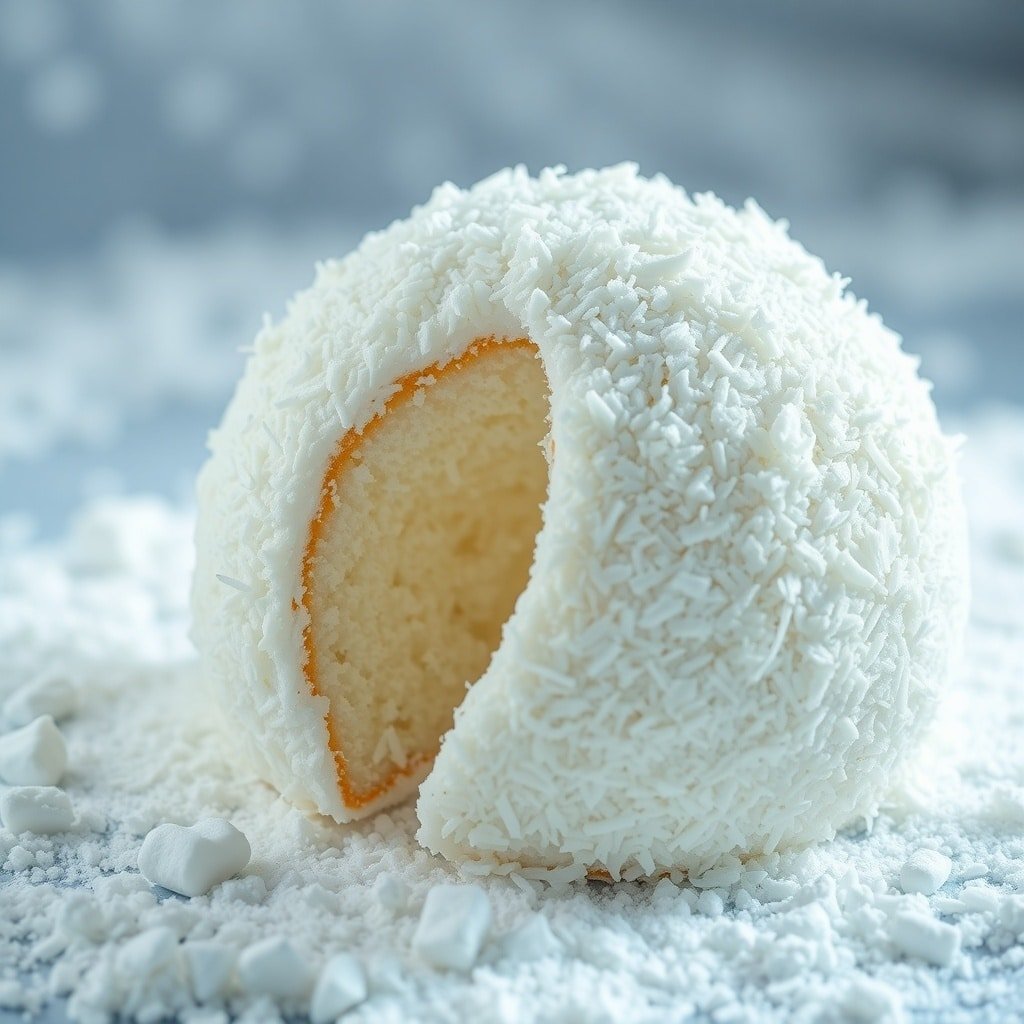
The Coconut Snowball Cake is a delightful treat that captures the spirit of the holiday season. Its snowy exterior, covered in fluffy coconut, makes it a stunning centerpiece for any Christmas gathering. The cake is soft and moist, with a light sweetness that pairs perfectly with the rich coconut flavor. This cake not only looks beautiful but also tastes amazing, making it a favorite among Christmas cake designs.
Imagine slicing into this cake to reveal its soft, tender crumb. The contrast between the snowy outside and the soft inside is simply irresistible. It’s perfect for sharing with family and friends during festive celebrations. Plus, it’s a fun cake to make with kids, who will love rolling it in coconut!
Ingredients
- 1 ½ cups all-purpose flour
- 1 cup granulated sugar
- ½ cup unsalted butter, softened
- 2 large eggs
- 1 cup coconut milk
- 1 teaspoon baking powder
- ½ teaspoon salt
- 1 cup shredded coconut
- 1 teaspoon vanilla extract
- 1 cup powdered sugar (for frosting)
- 2 tablespoons milk (for frosting)
- Extra shredded coconut for decoration
Instructions
- Preheat the oven to 350°F (175°C). Grease and flour a round cake pan.
- In a mixing bowl, cream together the softened butter and granulated sugar until light and fluffy. Add the eggs one at a time, mixing well after each addition.
- Stir in the coconut milk and vanilla extract. In another bowl, combine the flour, baking powder, and salt. Gradually add the dry ingredients to the wet mixture, mixing until just combined.
- Fold in the shredded coconut. Pour the batter into the prepared cake pan and smooth the top.
- Bake for 25-30 minutes, or until a toothpick inserted into the center comes out clean. Let the cake cool in the pan for 10 minutes before transferring it to a wire rack to cool completely.
- For the frosting, mix powdered sugar with milk until smooth. Once the cake is cool, spread the frosting over the top and sides of the cake.
- Finally, roll the frosted cake in extra shredded coconut until fully coated. Slice and serve this festive Coconut Snowball Cake at your holiday gatherings!
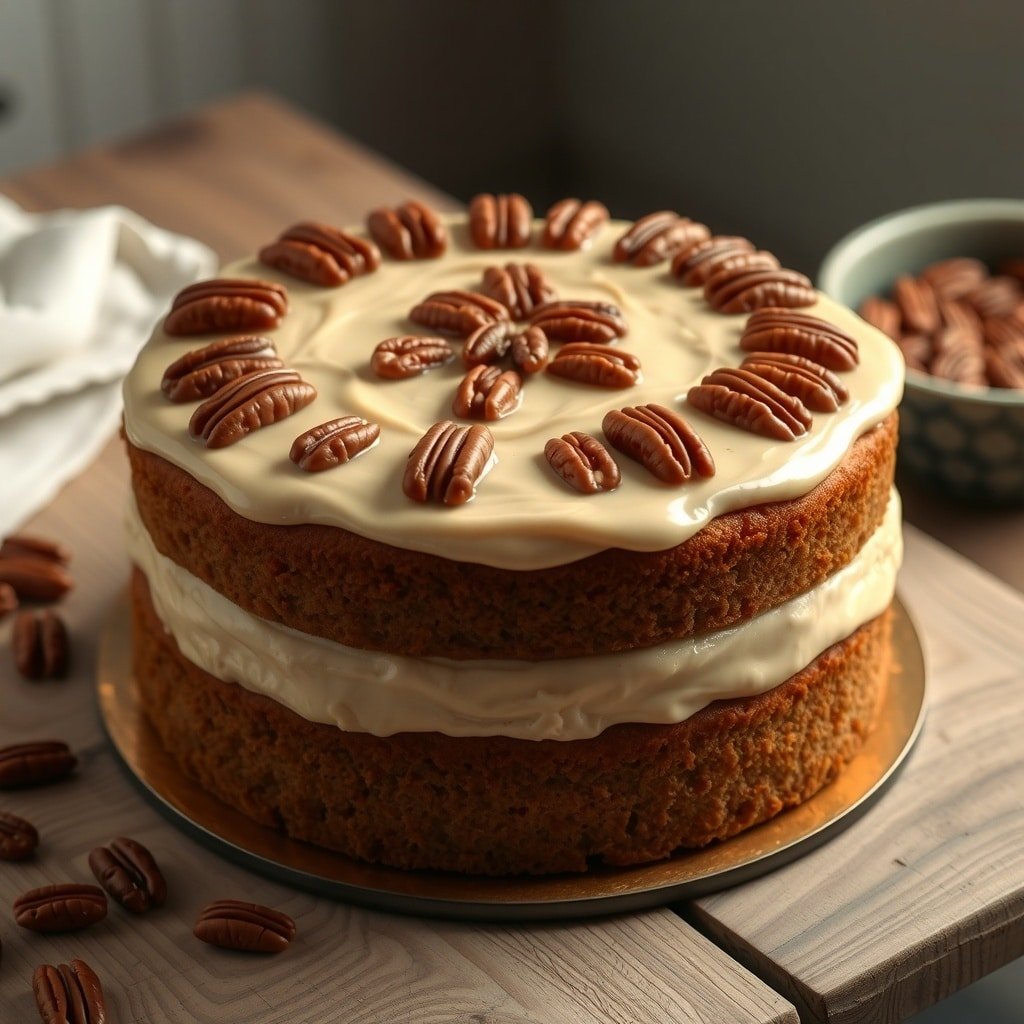
Carrot Cake with Cream Cheese Frosting
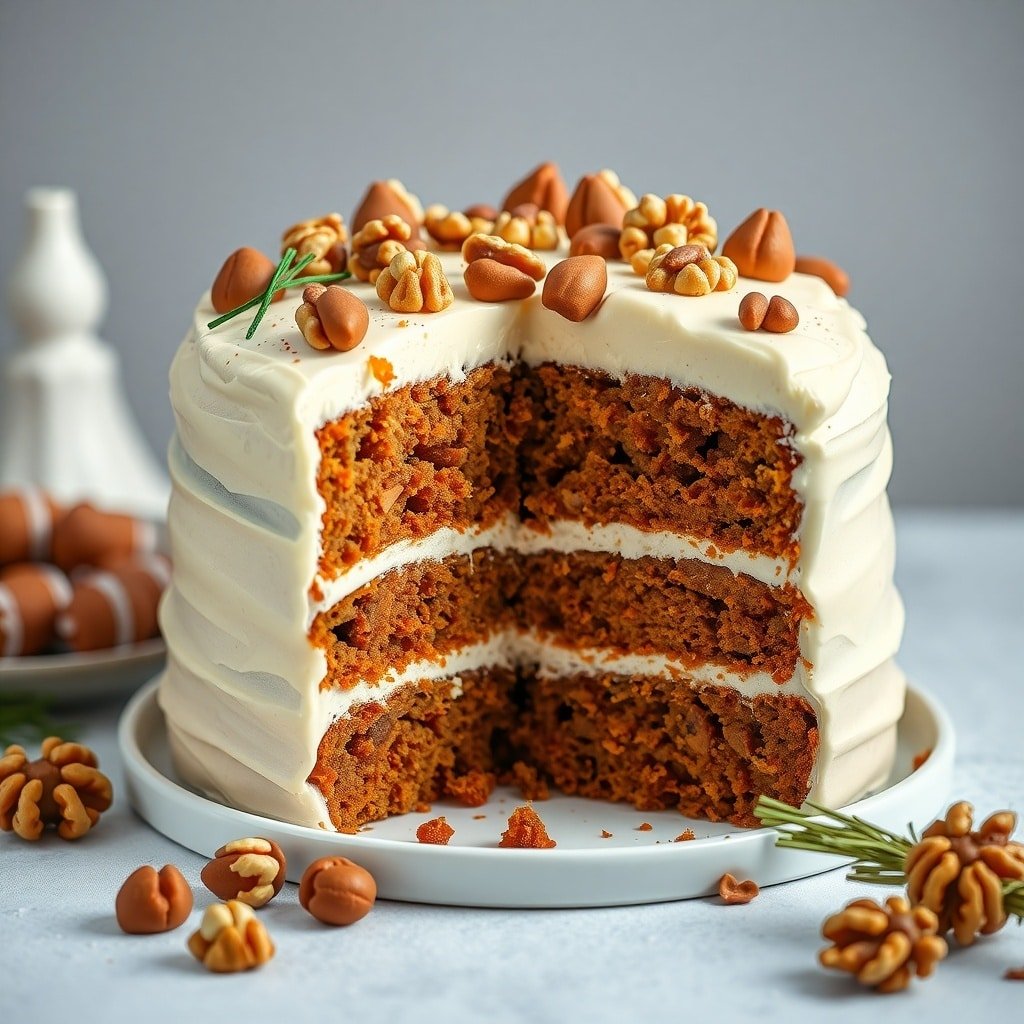
Carrot cake is a classic choice for Christmas celebrations. Its warm spices and moist texture make it a favorite during the holiday season. This cake is often layered with rich cream cheese frosting, which perfectly complements the sweetness of the carrots.
The image shows a beautifully decorated carrot cake. The layers are visible, showcasing the soft, spiced cake filled with cream cheese frosting. Topped with walnuts and chocolate candies, it looks festive and inviting. This cake not only tastes great but also adds a lovely touch to your Christmas cake designs.
Making a carrot cake is easier than you might think. With simple ingredients and a few steps, you can create a delicious dessert that everyone will love.
Ingredients
- 2 cups all-purpose flour
- 2 cups granulated sugar
- 1 teaspoon baking powder
- 1 teaspoon baking soda
- 1 teaspoon ground cinnamon
- 1/2 teaspoon ground nutmeg
- 1/2 teaspoon salt
- 1 cup vegetable oil
- 4 large eggs
- 3 cups grated carrots
- 1 cup crushed pineapple, drained
- 1 cup chopped walnuts
- 8 oz cream cheese, softened
- 1/2 cup unsalted butter, softened
- 4 cups powdered sugar
- 1 teaspoon vanilla extract
Instructions
- Preheat your oven to 350°F (175°C). Grease and flour two 9-inch round cake pans.
- In a large bowl, mix flour, sugar, baking powder, baking soda, cinnamon, nutmeg, and salt.
- In another bowl, whisk together oil and eggs until combined. Stir in grated carrots and crushed pineapple.
- Combine the wet and dry ingredients, mixing until just combined. Fold in chopped walnuts.
- Divide the batter evenly between the prepared pans. Bake for 25-30 minutes, or until a toothpick inserted in the center comes out clean.
- Let the cakes cool in the pans for 10 minutes, then transfer to wire racks to cool completely.
- For the frosting, beat together cream cheese and butter until smooth. Gradually add powdered sugar and vanilla, mixing until creamy.
- Once the cakes are cool, spread frosting between the layers and on top and sides of the cake. Decorate with additional walnuts if desired.
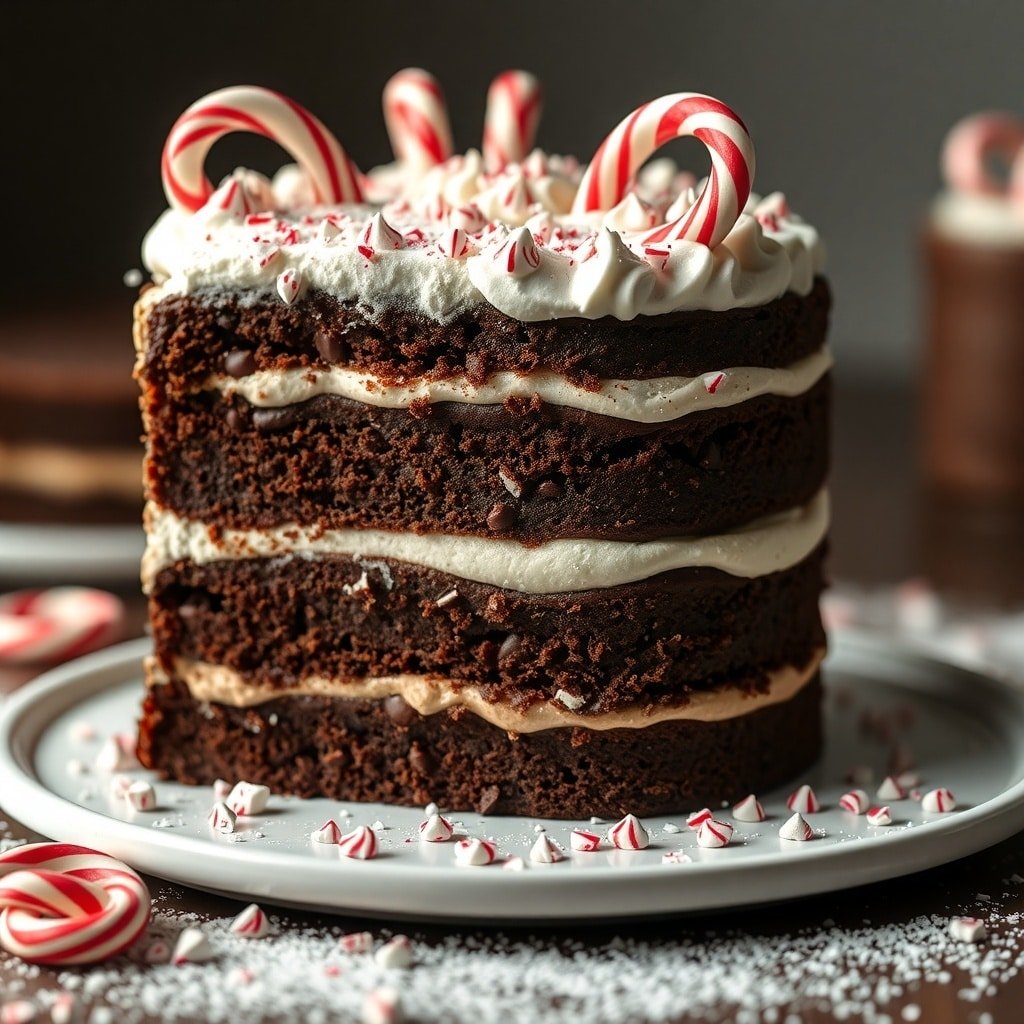
Chocolate Peppermint Layer Cake
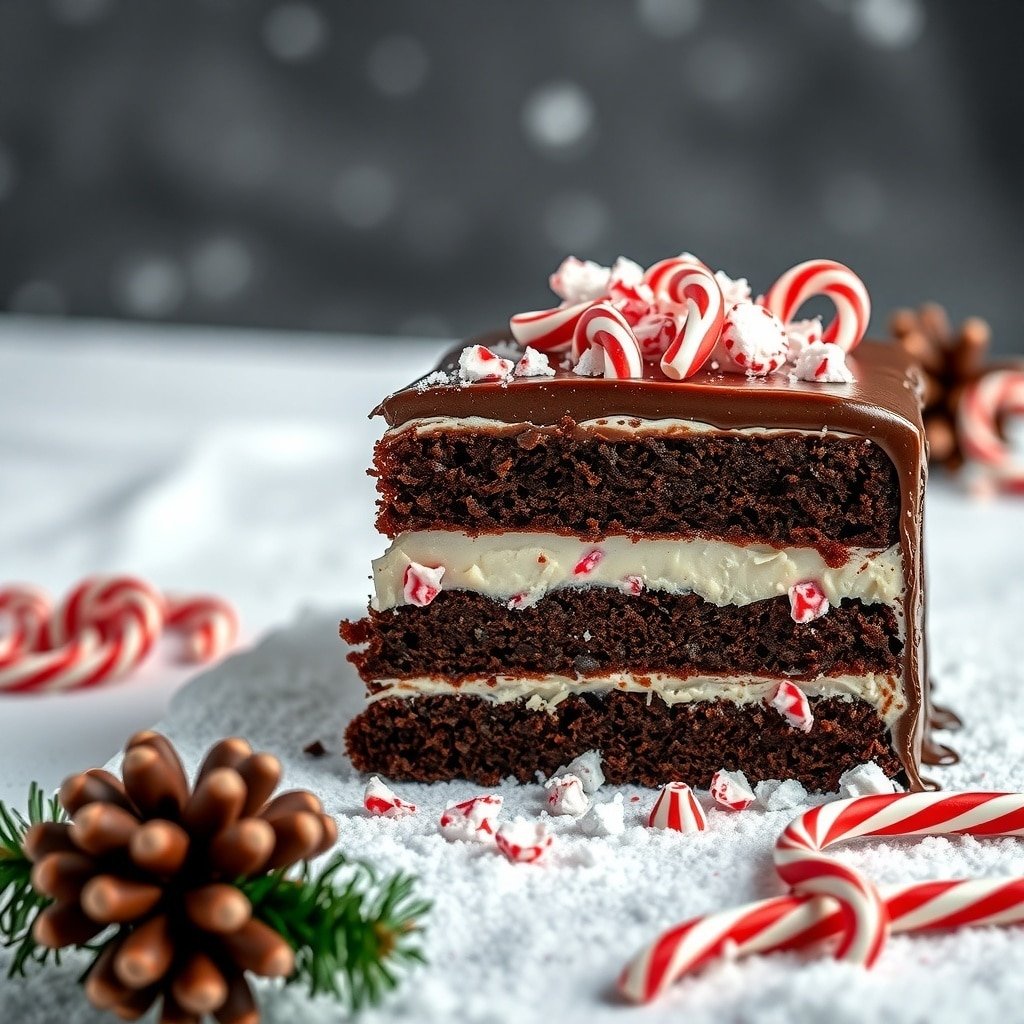
Chocolate Peppermint Layer Cake is a festive treat that brings joy to any holiday gathering. The rich chocolate layers are perfectly complemented by a creamy peppermint filling, making it a delightful choice for Christmas cake designs. The cake is not just a feast for the taste buds; it’s also a visual delight. Topped with chocolate ganache and crushed peppermint candies, it looks stunning on any dessert table.
Each slice reveals layers of moist chocolate cake and smooth peppermint cream, creating a wonderful contrast in flavors. The festive colors and textures make it a perfect centerpiece for your holiday celebrations. Whether you’re hosting a party or looking for a sweet gift, this cake is sure to impress.
Ingredients
- 1 3/4 cups all-purpose flour
- 3/4 cup unsweetened cocoa powder
- 2 cups granulated sugar
- 1 1/2 teaspoons baking powder
- 1 1/2 teaspoons baking soda
- 1 teaspoon salt
- 2 large eggs
- 1 cup whole milk
- 1/2 cup vegetable oil
- 2 teaspoons vanilla extract
- 1 cup boiling water
- 1 cup heavy cream
- 1/2 cup powdered sugar
- 1 teaspoon peppermint extract
- 1 cup chocolate ganache (for topping)
- Candy canes (for garnish)
Instructions
- Preheat the oven to 350°F (175°C). Grease and flour three 9-inch round cake pans.
- In a large bowl, mix flour, cocoa powder, sugar, baking powder, baking soda, and salt. Add eggs, milk, oil, and vanilla. Beat on medium speed for 2 minutes. Stir in boiling water until well combined.
- Pour the batter evenly into the prepared pans. Bake for 30-35 minutes or until a toothpick comes out clean. Let the cakes cool in the pans for 10 minutes, then transfer to wire racks to cool completely.
- For the filling, whip the heavy cream until soft peaks form. Gradually add powdered sugar and peppermint extract, continuing to whip until stiff peaks form.
- Once the cakes are cool, place one layer on a serving plate. Spread a layer of peppermint filling on top. Repeat with the second layer and add the final layer on top.
- Pour the chocolate ganache over the top of the cake, allowing it to drip down the sides. Garnish with crushed candy canes.
- Slice and serve this festive Chocolate Peppermint Layer Cake at your holiday gatherings!
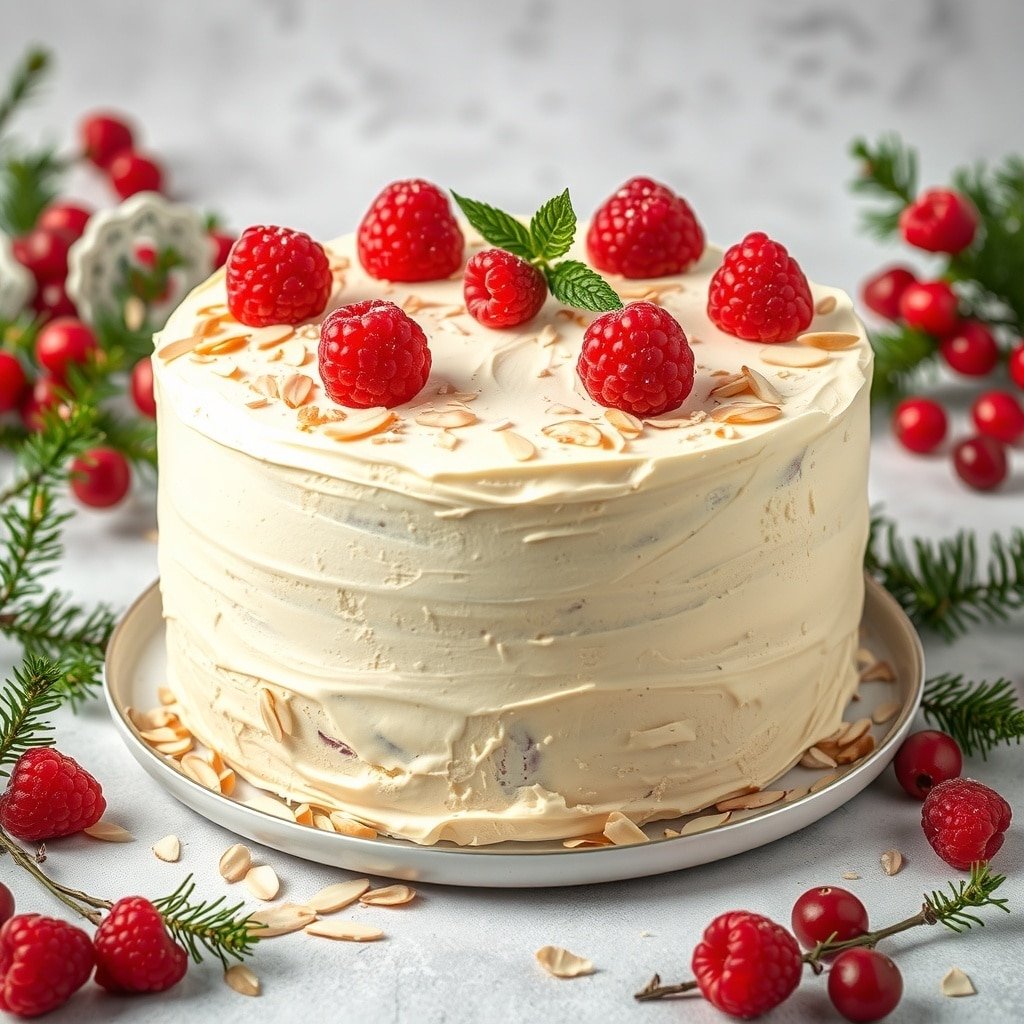
Vanilla Bean Cake with Berry Compote
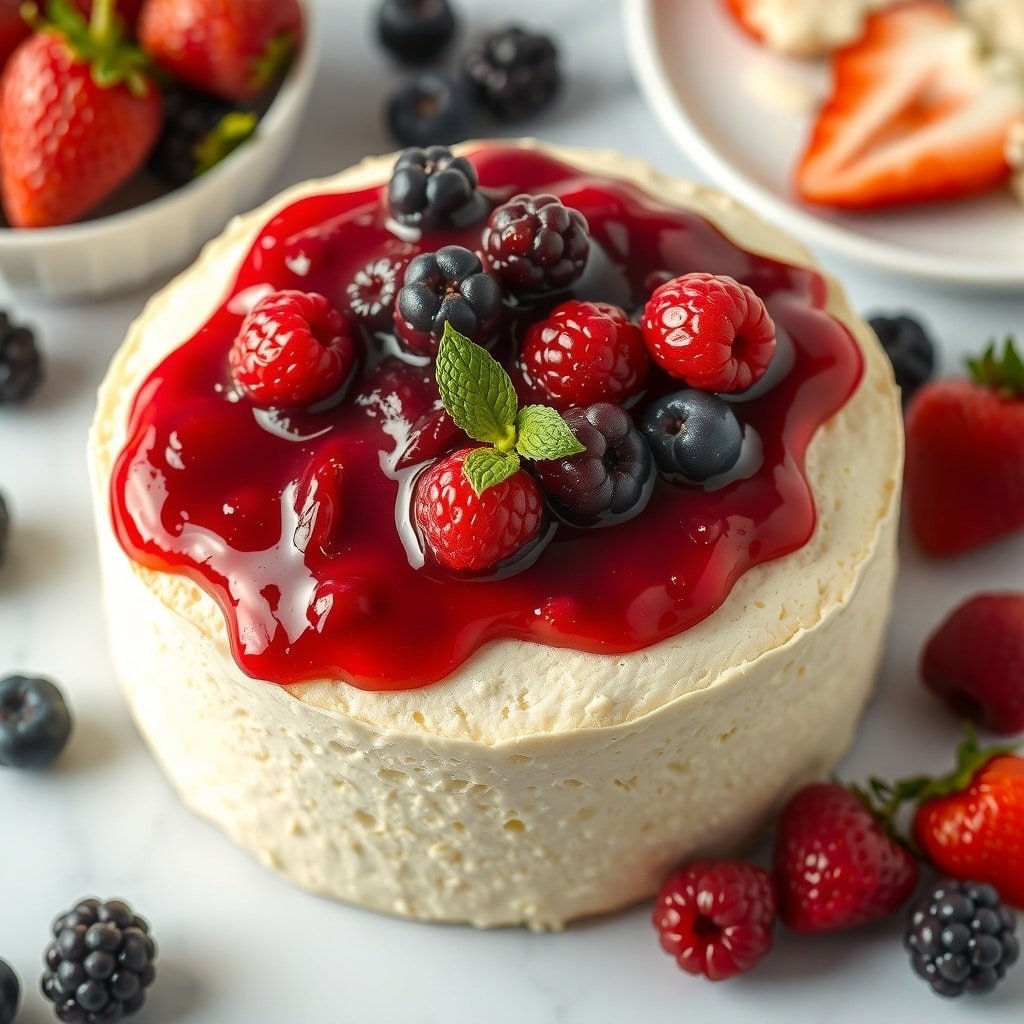
Vanilla bean cake is a classic choice for any festive occasion, especially during Christmas. This cake is light, fluffy, and bursting with the rich flavor of vanilla beans. Topped with a vibrant berry compote, it adds a refreshing touch that perfectly complements the sweetness of the cake.
The image showcases a beautifully decorated vanilla bean cake, adorned with a glossy berry compote and fresh berries. The bright red and deep blue hues of the berries create a stunning contrast against the creamy cake, making it a showstopper on any dessert table. This cake is not just a treat for the taste buds but also a feast for the eyes, embodying the spirit of Christmas cake designs.
Making this cake is a delightful experience. You can customize the berry compote with your favorite fruits or even add a hint of citrus for an extra zing. This cake is sure to be a hit at your holiday gatherings, bringing smiles and joy to everyone who tries it.
Ingredients
- 2 cups all-purpose flour
- 1 ½ cups granulated sugar
- 1 cup unsalted butter, softened
- 4 large eggs
- 1 cup buttermilk
- 2 teaspoons vanilla bean paste
- 2 teaspoons baking powder
- ½ teaspoon salt
- 2 cups mixed fresh berries (strawberries, blueberries, raspberries)
- 1 cup berry jam or jelly
- Fresh mint leaves for garnish
Instructions
- Preheat your oven to 350°F (175°C). Grease and flour two 9-inch round cake pans.
- In a large bowl, cream together the softened butter and granulated sugar until light and fluffy. Add the eggs one at a time, mixing well after each addition.
- Stir in the buttermilk and vanilla bean paste until combined.
- In another bowl, whisk together the flour, baking powder, and salt. Gradually add the dry ingredients to the wet mixture, mixing until just combined.
- Divide the batter evenly between the prepared cake pans. Bake for 25-30 minutes or until a toothpick inserted in the center comes out clean.
- Let the cakes cool in the pans for 10 minutes, then transfer them to wire racks to cool completely.
- While the cakes cool, prepare the berry compote. In a saucepan, combine the mixed berries and berry jam over medium heat. Cook until the berries soften and the mixture thickens slightly, about 5-7 minutes. Remove from heat and let it cool.
- Once the cakes are cool, place one layer on a serving plate. Spread a layer of berry compote on top, then place the second cake layer on top.
- Top the cake with the remaining berry compote and garnish with fresh berries and mint leaves. Slice and serve!
Marble Cake with Chocolate Ganache
Marble cake is a classic choice for festive gatherings, especially during the holiday season. This cake combines the rich flavors of chocolate and vanilla, creating a beautiful swirl that is as pleasing to the eye as it is to the palate. The glossy chocolate ganache on top adds an extra layer of indulgence, making it a standout on any dessert table.
When you slice into this cake, the contrasting colors of the chocolate and vanilla batter create a stunning effect. It’s perfect for those who can’t decide between chocolate and vanilla flavors. Plus, it’s a fun project to make with family or friends, bringing everyone together in the kitchen.
For those looking for unique Christmas cake designs, this marble cake is not only delicious but also visually appealing. It’s sure to impress your guests and make your holiday celebrations even sweeter!
Ingredients
- 1 3/4 cups all-purpose flour
- 1 cup granulated sugar
- 1/2 cup unsalted butter, softened
- 3/4 cup milk
- 2 large eggs
- 2 teaspoons baking powder
- 1 teaspoon vanilla extract
- 1/2 cup unsweetened cocoa powder
- 1/2 cup heavy cream
- 8 ounces semi-sweet chocolate, chopped
Instructions
- Preheat your oven to 350°F (175°C). Grease and flour a 9-inch round cake pan.
- In a large bowl, cream together the softened butter and sugar until light and fluffy. Add in the eggs, one at a time, mixing well after each addition.
- Stir in the milk and vanilla extract. Gradually add the flour and baking powder, mixing until just combined.
- Divide the batter in half. To one half, stir in the cocoa powder until well blended.
- Pour alternating spoonfuls of the vanilla and chocolate batter into the prepared cake pan. Use a knife to swirl the batters together gently.
- Bake for 30-35 minutes, or until a toothpick inserted in the center comes out clean. Allow the cake to cool in the pan for 10 minutes before transferring it to a wire rack.
- For the ganache, heat the heavy cream in a small saucepan until just simmering. Pour it over the chopped chocolate in a bowl and let it sit for a few minutes. Stir until smooth and glossy.
- Once the cake is completely cool, pour the ganache over the top, letting it drip down the sides. Slice and enjoy your festive marble cake!
Fruit and Nut Chocolate Cake
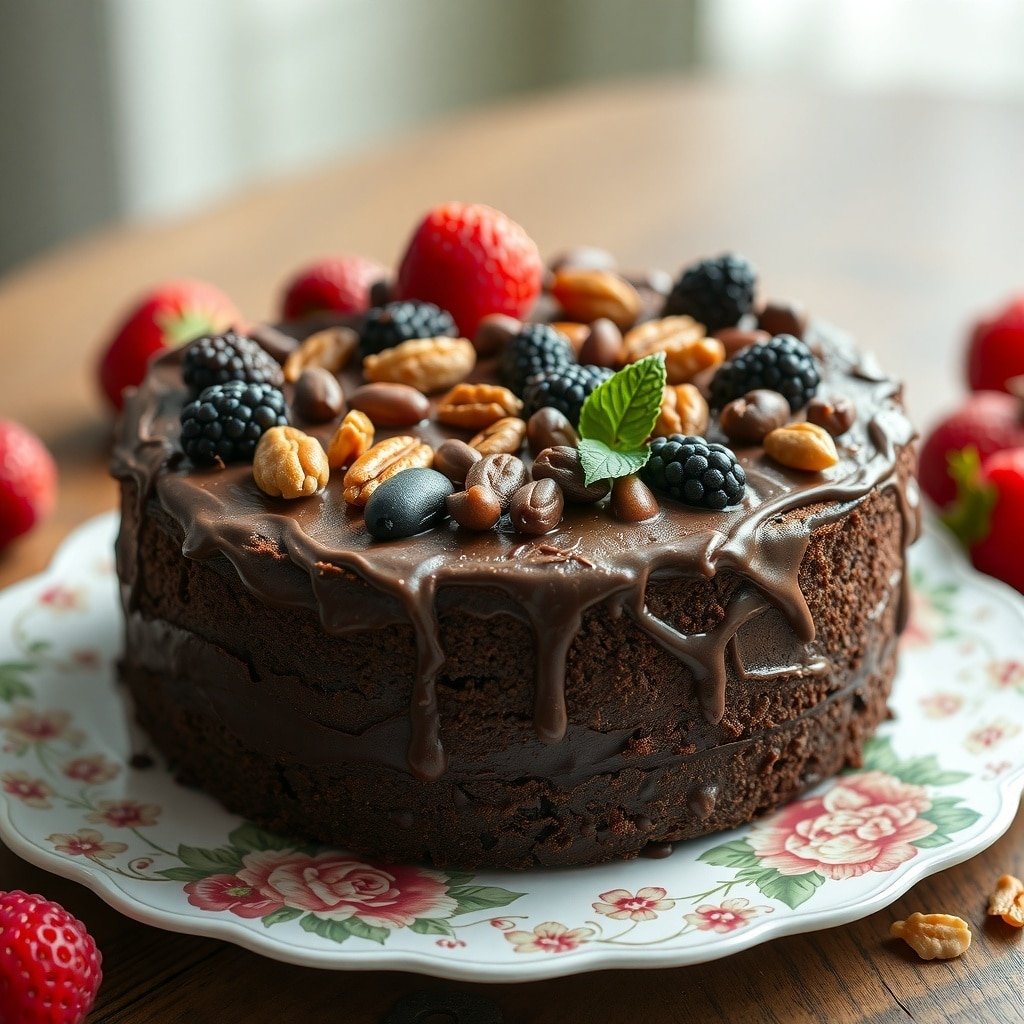
The Fruit and Nut Chocolate Cake is a delightful treat that combines rich chocolate with the natural sweetness of fruits and the crunch of nuts. This cake is perfect for the holiday season, making it a great addition to your Christmas cake designs. The glossy chocolate glaze adds a touch of elegance, while the toppings of fresh berries and nuts provide a colorful contrast.
Imagine serving this cake at your holiday gatherings. It not only looks stunning but tastes divine. The blend of flavors and textures will impress your guests and leave them wanting more. Plus, it’s a great way to incorporate healthy ingredients into your dessert!
Ingredients
- 1 ½ cups all-purpose flour
- 1 cup granulated sugar
- ½ cup unsweetened cocoa powder
- 1 teaspoon baking powder
- ½ teaspoon baking soda
- ½ teaspoon salt
- 1 cup buttermilk
- ½ cup vegetable oil
- 2 large eggs
- 1 teaspoon vanilla extract
- 1 cup mixed dried fruits (like raisins, apricots, and cranberries)
- 1 cup mixed nuts (like walnuts and almonds)
- 1 cup chocolate chips
- For the glaze: 1 cup heavy cream and 8 ounces dark chocolate, chopped
Instructions
- Preheat your oven to 350°F (175°C). Grease and flour a round cake pan.
- In a large bowl, mix together the flour, sugar, cocoa powder, baking powder, baking soda, and salt.
- Add the buttermilk, vegetable oil, eggs, and vanilla extract. Mix until smooth.
- Fold in the dried fruits, nuts, and chocolate chips.
- Pour the batter into the prepared cake pan. Bake for 30-35 minutes or until a toothpick comes out clean.
- While the cake cools, prepare the glaze. Heat the heavy cream in a saucepan until it just starts to simmer. Remove from heat and add the chopped chocolate. Stir until smooth.
- Once the cake is cool, pour the chocolate glaze over the top. Decorate with fresh berries and additional nuts if desired.
- Slice and serve this beautiful cake at your holiday gatherings!
Cinnamon Roll Cake
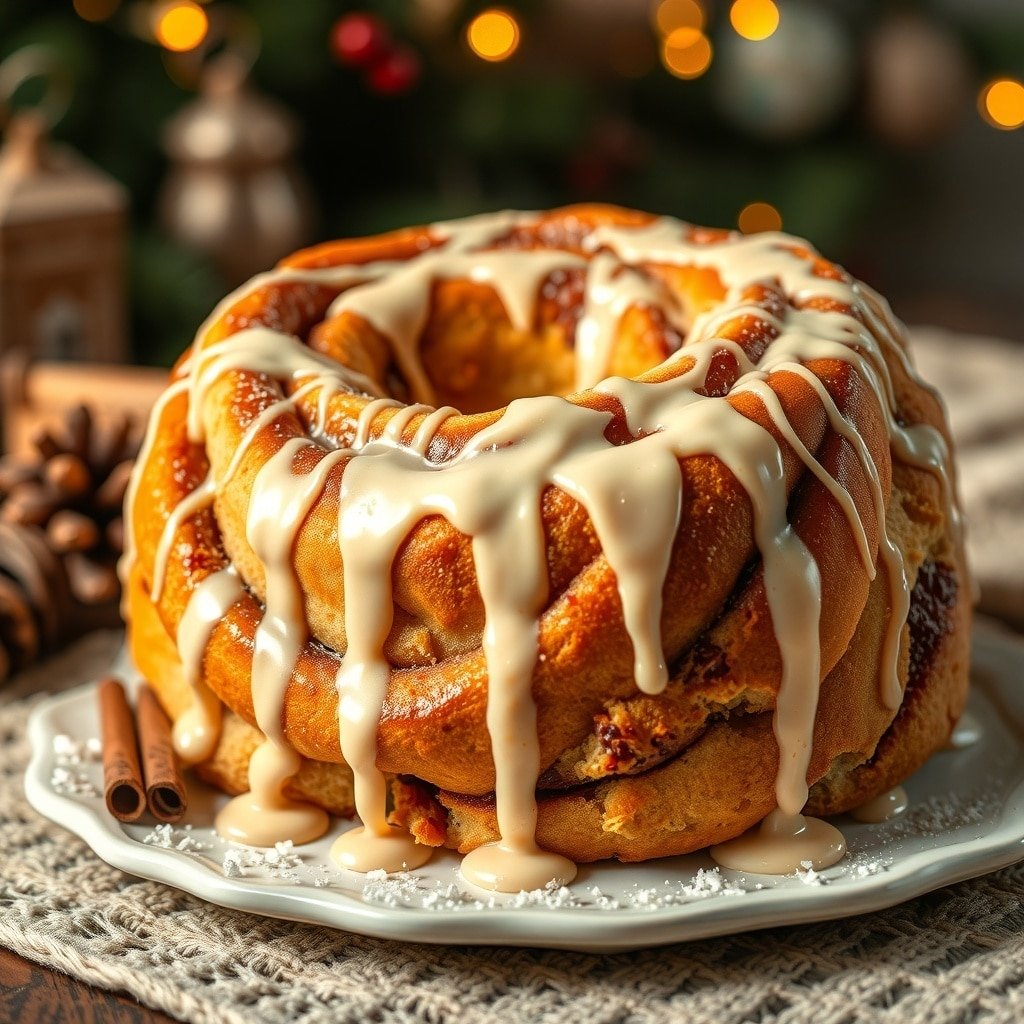
Cinnamon Roll Cake is a delightful twist on the traditional cinnamon rolls we all love. This cake captures the warm, comforting flavors of cinnamon and sugar, making it a perfect addition to your Christmas cake designs. The image showcases a beautifully swirled cake topped with a creamy glaze, inviting everyone to take a slice.
Imagine serving this cake at your holiday gatherings. Its soft, fluffy texture and sweet aroma will fill your home with joy. The cake is easy to slice, making it perfect for sharing with family and friends. Plus, it looks stunning on any dessert table!
To make this festive treat, you’ll need some simple ingredients. Gather flour, sugar, butter, eggs, and, of course, cinnamon. The steps are straightforward, and soon you’ll have a cake that brings smiles all around.
Ingredients
- 2 cups all-purpose flour
- 1 cup granulated sugar
- 1 tablespoon baking powder
- 1/2 teaspoon salt
- 1/2 cup unsalted butter, melted
- 1 cup milk
- 2 large eggs
- 1 tablespoon vanilla extract
- 1 cup brown sugar, packed
- 2 tablespoons ground cinnamon
- 1/4 cup unsalted butter, softened
- 1 cup powdered sugar
- 2 tablespoons milk (for glaze)
Instructions
- Preheat your oven to 350°F (175°C) and grease a bundt pan.
- In a large bowl, mix flour, sugar, baking powder, and salt. In another bowl, combine melted butter, milk, eggs, and vanilla.
- Pour the wet ingredients into the dry ingredients and mix until just combined.
- In a small bowl, mix brown sugar and cinnamon. Pour half of the batter into the prepared pan, then sprinkle half of the cinnamon mixture over it. Add the remaining batter and top with the rest of the cinnamon mixture.
- Bake for 30-35 minutes or until a toothpick comes out clean. Let it cool for a few minutes before inverting onto a plate.
- For the glaze, mix powdered sugar and milk until smooth. Drizzle over the cooled cake and serve!
Chocolate Chip Cookie Cake
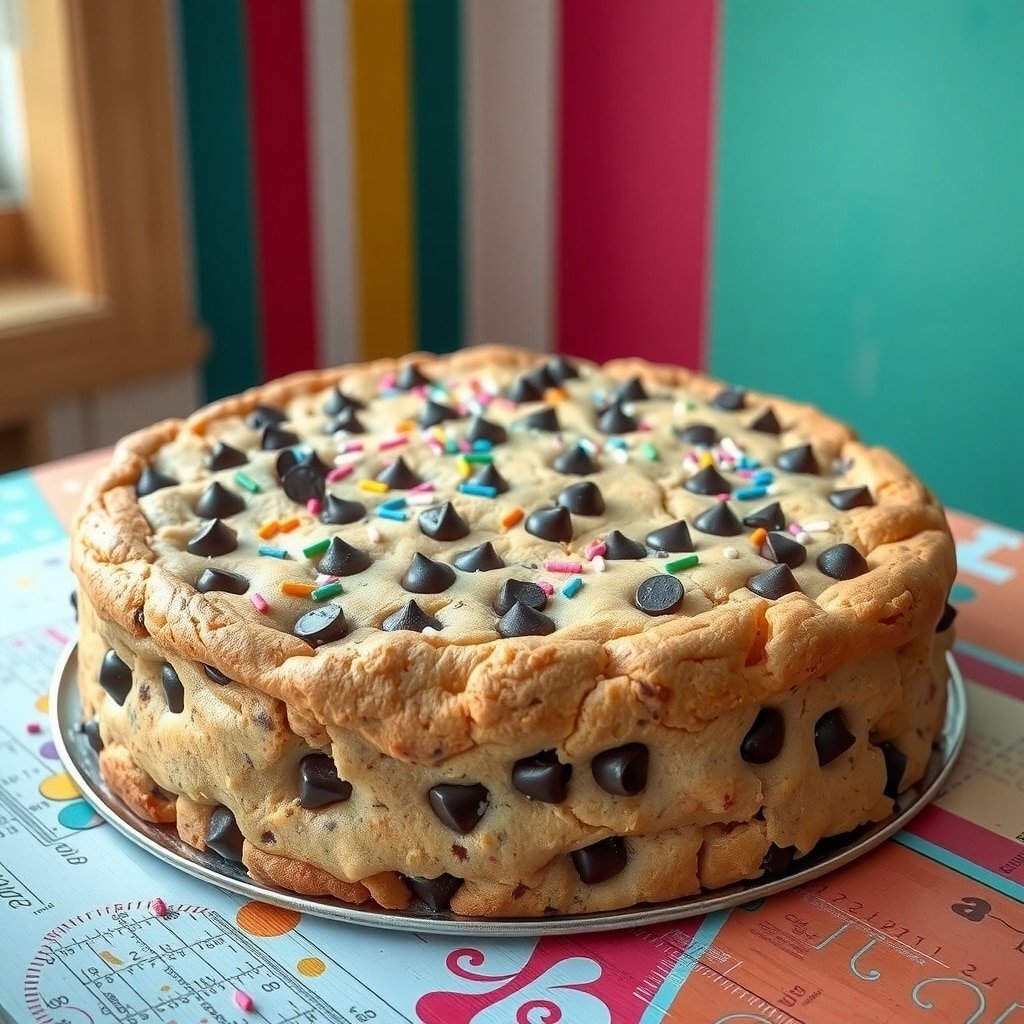
Chocolate chip cookie cake is a fun twist on the classic cookie. This cake is soft, chewy, and loaded with chocolate chips, making it a perfect treat for the holiday season. It’s a great centerpiece for any Christmas gathering and can easily be decorated to fit your festive theme.
The cake in the image is beautifully baked, showcasing a golden-brown exterior with chocolate chips peeking through. The colorful sprinkles add a playful touch, making it even more inviting. This cake is not just delicious; it also brings a cheerful vibe to your Christmas cake designs.
Making this cake is simple and fun. You can involve family or friends in the process, turning it into a delightful activity. The aroma of freshly baked cookies will fill your home, creating a warm holiday atmosphere.
Ingredients
- 2 1/4 cups all-purpose flour
- 1 teaspoon baking soda
- 1/2 teaspoon salt
- 1 cup unsalted butter, softened
- 3/4 cup granulated sugar
- 3/4 cup brown sugar, packed
- 1 teaspoon vanilla extract
- 2 large eggs
- 2 cups semi-sweet chocolate chips
- 1/4 cup colorful sprinkles (optional)
Instructions
- Preheat your oven to 350°F (175°C). Grease a 9-inch round cake pan.
- In a bowl, mix flour, baking soda, and salt. Set aside.
- In another large bowl, beat together the softened butter, granulated sugar, brown sugar, and vanilla until creamy.
- Add the eggs one at a time, mixing well after each addition.
- Gradually add the flour mixture to the wet ingredients, stirring until just combined.
- Fold in the chocolate chips and sprinkles if using.
- Pour the batter into the prepared cake pan and spread evenly.
- Bake for 25-30 minutes or until a toothpick inserted in the center comes out clean.
- Let the cake cool in the pan for 10 minutes before transferring it to a wire rack to cool completely.
Maple Pecan Cake
Maple Pecan Cake is a delightful treat perfect for the holiday season. This cake features layers of moist, flavorful cake topped with a creamy frosting and crunchy pecans. It’s a wonderful addition to your Christmas cake designs, bringing warmth and sweetness to your festive table.
The cake itself is made with rich maple syrup, which gives it a unique flavor that pairs beautifully with the nuttiness of pecans. The frosting is smooth and creamy, making each bite a delightful experience. Decorate the top with whole pecans for a lovely presentation that will impress your guests.
Making this cake is straightforward. You’ll enjoy the process of mixing the ingredients and watching it rise in the oven. Once baked, let it cool before frosting. This cake is not just a dessert; it’s a centerpiece for your holiday gatherings.
Ingredients
- 2 cups all-purpose flour
- 1 cup granulated sugar
- 1/2 cup unsalted butter, softened
- 1 cup maple syrup
- 3 large eggs
- 1 teaspoon baking powder
- 1/2 teaspoon baking soda
- 1/2 teaspoon salt
- 1 cup buttermilk
- 1 teaspoon vanilla extract
- 1 cup chopped pecans
- 1 cup cream cheese, softened
- 2 cups powdered sugar
- 1/4 cup maple syrup (for frosting)
- Whole pecans for decoration
Instructions
- Preheat the oven to 350°F (175°C). Grease and flour two 9-inch round cake pans.
- In a large bowl, cream together the butter and sugar until light and fluffy. Add the eggs one at a time, mixing well after each addition.
- Stir in the maple syrup and vanilla extract. In another bowl, combine the flour, baking powder, baking soda, and salt.
- Gradually add the dry ingredients to the wet mixture, alternating with the buttermilk. Mix until just combined. Fold in the chopped pecans.
- Divide the batter evenly between the prepared pans. Bake for 25-30 minutes or until a toothpick inserted in the center comes out clean.
- Let the cakes cool in the pans for 10 minutes, then transfer to wire racks to cool completely.
- For the frosting, beat together the cream cheese, powdered sugar, and maple syrup until smooth.
- Once the cakes are cool, spread frosting between the layers and on top. Decorate with whole pecans.
- Slice and serve this delicious Maple Pecan Cake at your holiday gatherings!
S’mores Christmas Cake
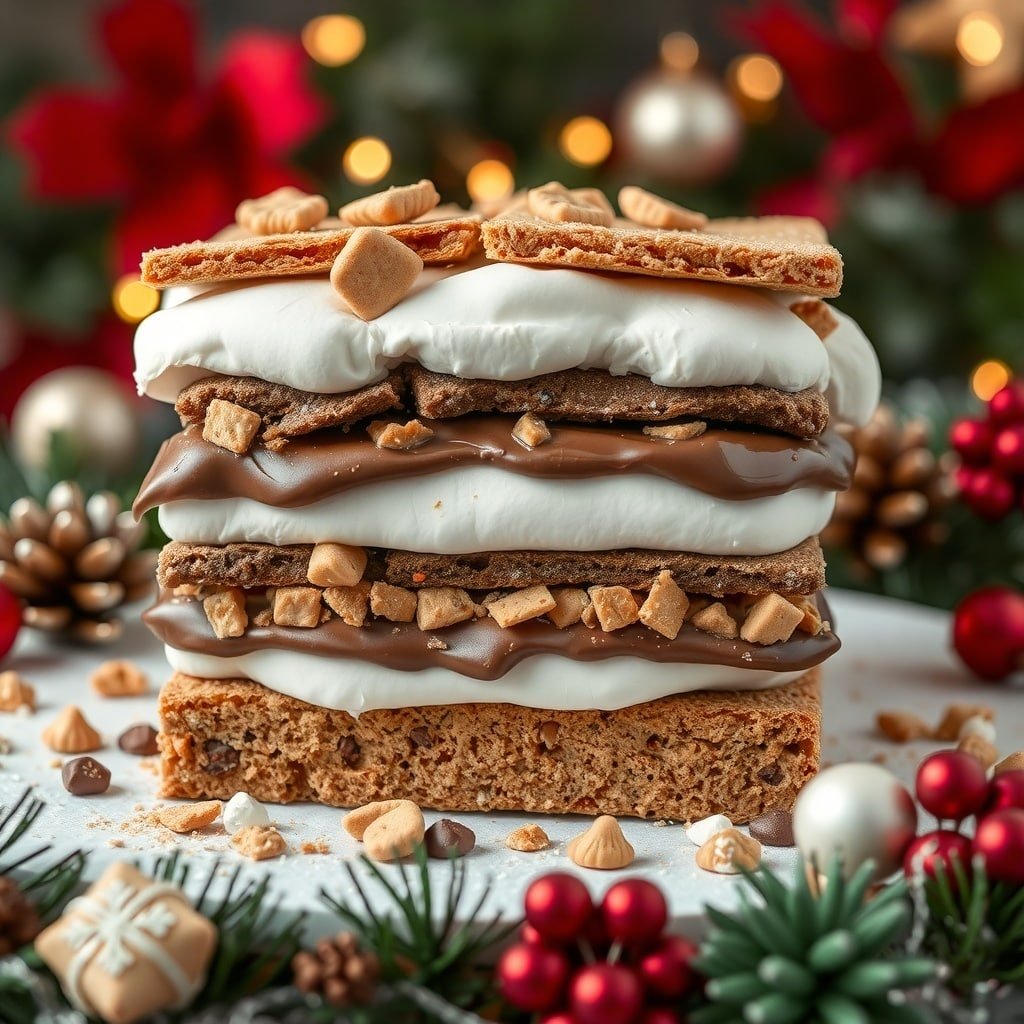
Picture a cozy holiday gathering where everyone is enjoying a slice of S’mores Christmas Cake. This delightful dessert combines the classic flavors of s’mores with a festive twist, making it a perfect addition to your Christmas cake designs. The cake features layers of graham crackers, rich chocolate, and fluffy marshmallow cream, all stacked high for a show-stopping presentation.
The cake is not just a treat for the eyes; it’s a treat for the taste buds too! Each bite offers a perfect balance of sweetness and texture, with crunchy layers and creamy fillings. It’s a fun way to bring the warmth of a campfire into your holiday celebrations.
To make this S’mores Christmas Cake, you’ll need some simple ingredients. It’s easy to prepare and will surely impress your guests. Here’s how to make it:
Ingredients
- 1 box of chocolate cake mix
- 3 large eggs
- 1 cup water
- 1/2 cup vegetable oil
- 1 cup graham cracker crumbs
- 1 cup chocolate frosting
- 2 cups marshmallow fluff
- 1 cup mini marshmallows
- 1/2 cup chocolate chips
- Graham crackers for decoration
Instructions
- Preheat your oven to 350°F (175°C). Grease and flour two 9-inch round cake pans.
- In a large bowl, mix the chocolate cake mix, eggs, water, and vegetable oil until well combined. Divide the batter evenly between the two prepared pans.
- Bake for 25-30 minutes, or until a toothpick inserted in the center comes out clean. Let the cakes cool in the pans for 10 minutes, then transfer to wire racks to cool completely.
- Once cooled, place one cake layer on a serving plate. Spread a layer of chocolate frosting on top, followed by a layer of marshmallow fluff.
- Sprinkle graham cracker crumbs and mini marshmallows over the fluff. Place the second cake layer on top and repeat the frosting and fluff layers.
- Top the cake with more mini marshmallows, chocolate chips, and crushed graham crackers for decoration.
- Slice and serve this festive S’mores Christmas Cake, and watch it disappear!
Raspberry Almond Cake
The Raspberry Almond Cake is a delightful treat that perfectly captures the spirit of the holiday season. With its soft layers and creamy frosting, this cake is not only a feast for the eyes but also a delicious addition to your Christmas table. The vibrant red raspberries on top add a pop of color, making it a standout among other Christmas cake designs.
This cake combines the nutty flavor of almonds with the tartness of raspberries, creating a wonderful balance. The smooth frosting complements the cake beautifully, making each bite a little slice of heaven. Whether you’re hosting a festive gathering or simply enjoying a quiet evening at home, this cake is sure to impress.
Making this cake is straightforward. You’ll need basic ingredients like flour, sugar, eggs, and, of course, raspberries and almonds. Don’t worry if you’re not a baking expert; the steps are simple enough for anyone to follow. So, roll up your sleeves and get ready to create a stunning dessert that everyone will love!
Ingredients
- 2 cups all-purpose flour
- 1 cup granulated sugar
- 1/2 cup unsalted butter, softened
- 1 cup milk
- 3 large eggs
- 1 teaspoon vanilla extract
- 1 teaspoon almond extract
- 1 tablespoon baking powder
- 1/2 teaspoon salt
- 1 cup fresh raspberries
- 1/2 cup sliced almonds
- 2 cups heavy cream
- 1/4 cup powdered sugar
Instructions
- Preheat your oven to 350°F (175°C). Grease and flour two 9-inch round cake pans.
- In a large bowl, cream together the butter and granulated sugar until light and fluffy. Add the eggs one at a time, mixing well after each addition.
- Stir in the vanilla and almond extracts. In another bowl, combine the flour, baking powder, and salt. Gradually add this dry mixture to the wet ingredients, alternating with the milk. Mix until just combined.
- Gently fold in the raspberries and sliced almonds. Divide the batter evenly between the prepared pans.
- Bake for 25-30 minutes or until a toothpick inserted in the center comes out clean. Allow the cakes to cool in the pans for 10 minutes before transferring to wire racks to cool completely.
- For the frosting, whip the heavy cream with powdered sugar until stiff peaks form. Once the cakes are cool, spread a layer of frosting between the two cake layers and cover the top and sides with the remaining frosting.
- Decorate with additional raspberries and sliced almonds on top. Slice and serve your beautiful Raspberry Almond Cake!
Gingerbread House Cake

Gingerbread house cakes are a delightful twist on traditional Christmas cakes. They combine the charm of a gingerbread house with the moistness of a cake, making them a festive centerpiece for your holiday table. Picture a beautifully decorated cake resembling a cozy gingerbread house, complete with icing, candy, and festive colors. This cake not only looks stunning but also tastes amazing!
To create your own gingerbread house cake, you can use gingerbread cake layers, which are spiced with cinnamon, ginger, and nutmeg. Layer these with creamy frosting and decorate with colorful candies, gumdrops, and icing to mimic the look of a real gingerbread house. It’s a fun project that can involve the whole family, making it a perfect holiday activity.
Here’s a simple recipe to make your own gingerbread house cake. Gather your ingredients and get ready to create a festive masterpiece!
Ingredients
- 2 cups all-purpose flour
- 1 teaspoon baking soda
- 1 tablespoon ground ginger
- 1 tablespoon ground cinnamon
- 1/2 teaspoon ground cloves
- 1/2 teaspoon salt
- 3/4 cup unsalted butter, softened
- 1 cup brown sugar, packed
- 1/2 cup granulated sugar
- 2 large eggs
- 1/2 cup molasses
- 1 cup buttermilk
- 4 cups powdered sugar (for frosting)
- 1/4 cup milk (for frosting)
- 1 teaspoon vanilla extract (for frosting)
- Decorative candies (for decoration)
Instructions
- Preheat the oven to 350°F (175°C). Grease and flour two round cake pans.
- In a bowl, mix flour, baking soda, ginger, cinnamon, cloves, and salt. Set aside.
- In a large bowl, cream together butter, brown sugar, and granulated sugar until light and fluffy. Add eggs one at a time, mixing well after each addition.
- Stir in molasses and buttermilk until well combined. Gradually add the dry ingredients, mixing until just combined.
- Divide the batter evenly between the prepared pans. Bake for 25-30 minutes, or until a toothpick inserted in the center comes out clean. Let cool in the pans for 10 minutes, then transfer to wire racks to cool completely.
- For the frosting, beat together powdered sugar, milk, and vanilla until smooth and spreadable.
- Once the cakes are cool, place one layer on a serving plate. Spread frosting on top, then place the second layer on top. Frost the top and sides of the cake.
- Decorate with candies to create your gingerbread house effect. Get creative with your designs!
Nutmeg Spice Cake with Cream Cheese Frosting
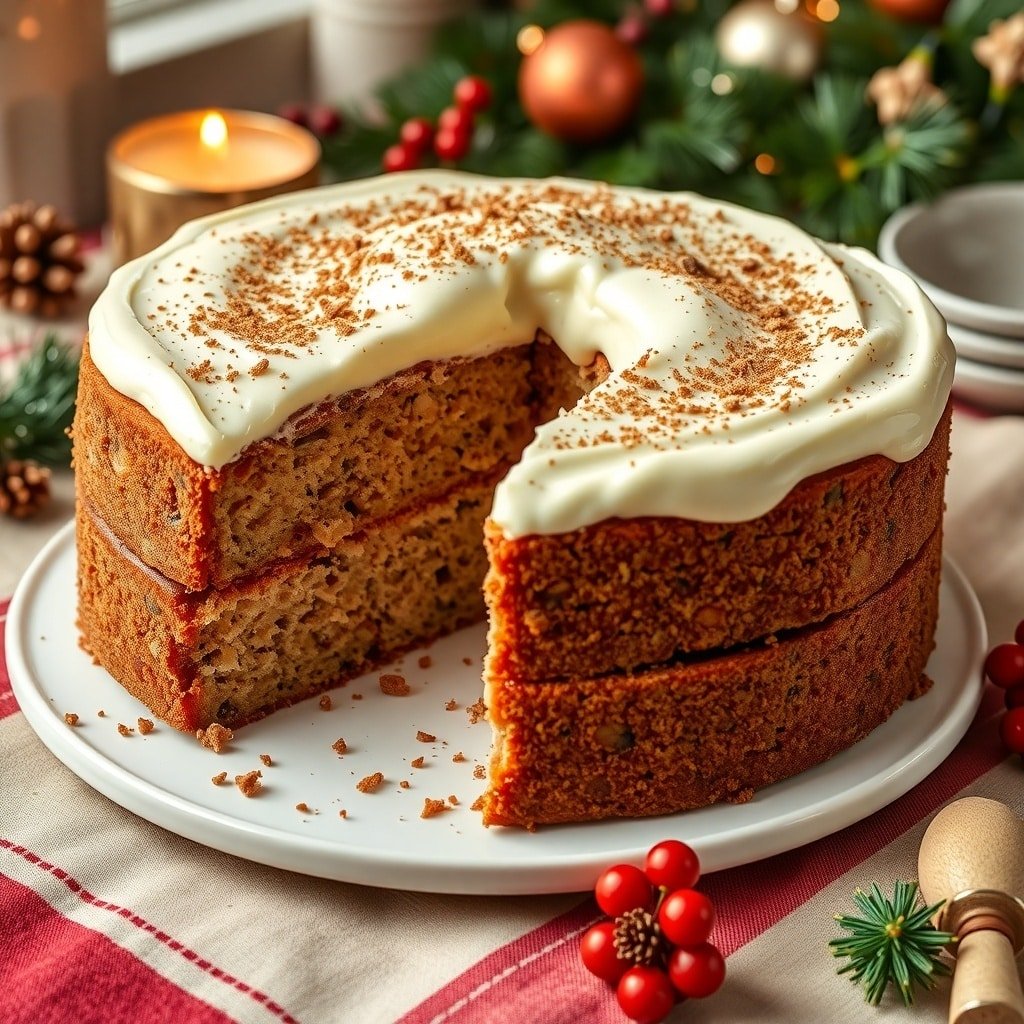
The Nutmeg Spice Cake is a delightful treat for the holiday season. Its warm, spiced flavor brings a cozy feeling to any Christmas gathering. The cake is layered and topped with a rich cream cheese frosting, making it a perfect centerpiece for your festive table.
This cake is not just about looks; it’s packed with flavors that remind you of Christmas. The nutmeg adds a unique twist, while the cream cheese frosting balances the spices perfectly. You can decorate it with a sprinkle of nutmeg or some festive decorations to match your Christmas cake designs.
Making this cake is easier than you might think. Gather your ingredients, and let’s get baking!
Ingredients
- 2 cups all-purpose flour
- 1 teaspoon baking powder
- 1 teaspoon baking soda
- 1 teaspoon ground nutmeg
- 1 teaspoon ground cinnamon
- 1/2 teaspoon salt
- 1 cup unsalted butter, softened
- 1 1/2 cups granulated sugar
- 4 large eggs
- 1 teaspoon vanilla extract
- 1 cup buttermilk
- 8 oz cream cheese, softened
- 4 cups powdered sugar
- 1 teaspoon vanilla extract (for frosting)
Instructions
- Preheat your oven to 350°F (175°C). Grease and flour three 8-inch round cake pans.
- In a bowl, whisk together flour, baking powder, baking soda, nutmeg, cinnamon, and salt.
- In a large mixing bowl, cream the softened butter and sugar until light and fluffy. Add eggs one at a time, mixing well after each addition. Stir in vanilla.
- Gradually add the dry ingredients to the butter mixture, alternating with buttermilk. Mix until just combined.
- Divide the batter evenly among the prepared pans. Bake for 25-30 minutes or until a toothpick inserted in the center comes out clean.
- Let the cakes cool in the pans for 10 minutes, then transfer to wire racks to cool completely.
- For the frosting, beat the cream cheese until smooth. Gradually add powdered sugar and vanilla, mixing until creamy.
- Once the cakes are cool, spread frosting between the layers and on top of the cake. Decorate as desired.
Chocolate Hazelnut Cake
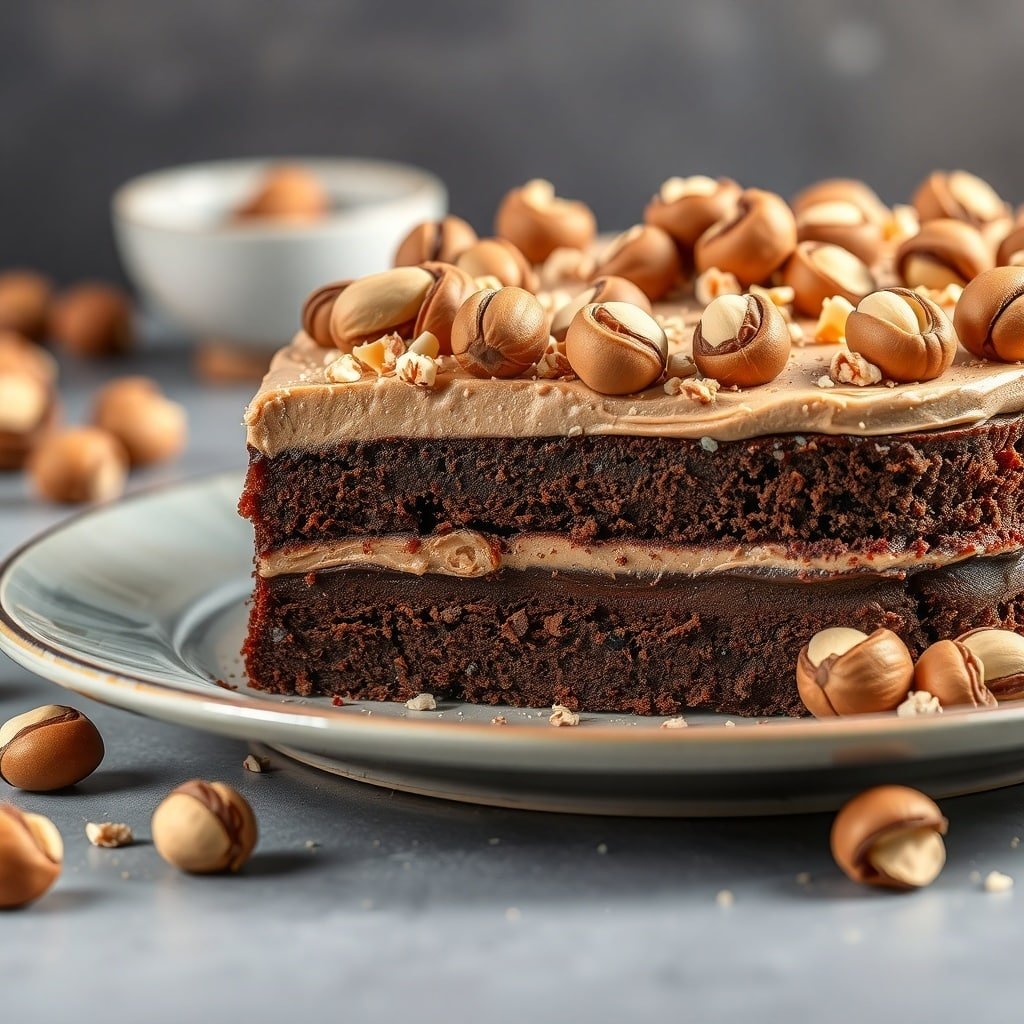
Chocolate Hazelnut Cake is a delightful treat that perfectly captures the spirit of the holidays. This cake features rich layers of chocolate, complemented by a creamy hazelnut frosting. The combination of flavors makes it a standout choice for any Christmas celebration.
The cake is not just about taste; it’s also visually appealing. Topped with crunchy hazelnuts and a smooth frosting, it looks festive and inviting. This cake can easily become the centerpiece of your Christmas cake designs, impressing family and friends alike.
Making this cake is straightforward. You’ll enjoy the process of mixing the ingredients and watching it rise in the oven. Once baked, layering the cake with frosting is where the fun really begins. It’s a great way to get creative and add your personal touch.
Ingredients
- 1 3/4 cups all-purpose flour
- 3/4 cup unsweetened cocoa powder
- 2 cups granulated sugar
- 1 1/2 teaspoons baking powder
- 1 1/2 teaspoons baking soda
- 1 teaspoon salt
- 2 large eggs
- 1 cup whole milk
- 1/2 cup vegetable oil
- 2 teaspoons vanilla extract
- 1 cup boiling water
- 1 cup hazelnut spread
- 1 cup heavy cream
- 1/2 cup powdered sugar
- 1 cup chopped hazelnuts (for topping)
Instructions
- Preheat your oven to 350°F (175°C). Grease and flour two 9-inch round cake pans.
- In a large bowl, mix flour, cocoa powder, sugar, baking powder, baking soda, and salt.
- Add eggs, milk, oil, and vanilla to the dry ingredients. Beat on medium speed for 2 minutes.
- Stir in boiling water until well combined. The batter will be thin.
- Pour the batter evenly into the prepared pans. Bake for 30-35 minutes or until a toothpick comes out clean.
- Let the cakes cool in the pans for 10 minutes before transferring them to a wire rack to cool completely.
- For the frosting, beat heavy cream and powdered sugar until stiff peaks form. Gently fold in hazelnut spread.
- Once the cakes are cool, spread frosting between the layers and on top. Decorate with chopped hazelnuts.
- Slice and serve your Chocolate Hazelnut Cake, enjoying the festive flavors!
Tiramisu Christmas Cake
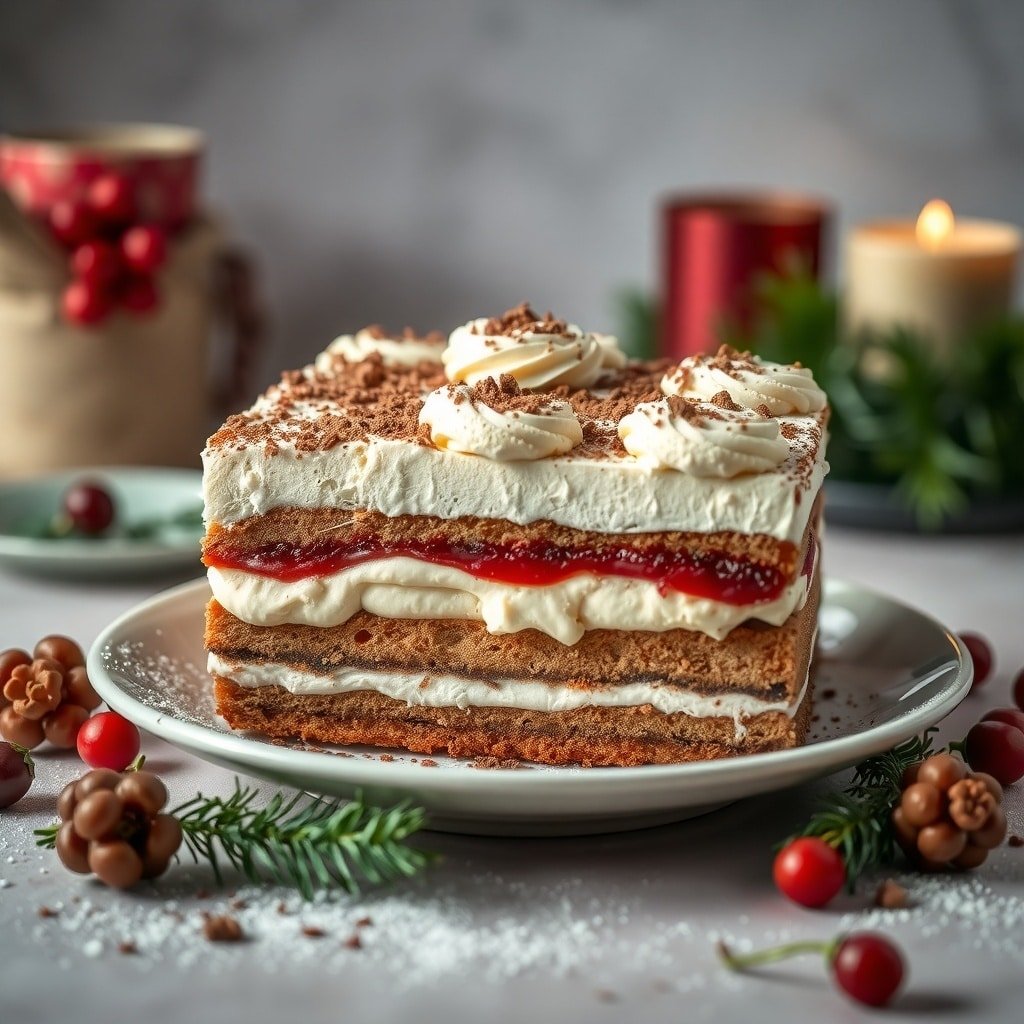
The Tiramisu Christmas Cake is a delightful twist on the classic Italian dessert. This cake features layers of coffee-soaked sponge, creamy mascarpone, and a hint of cocoa. It’s perfect for the holiday season, bringing a touch of elegance to your Christmas cake designs.
This cake is not just about looks; it’s a treat for the taste buds too. The combination of flavors makes it a standout choice for festive gatherings. Imagine serving this beautiful cake at your holiday table, with its rich layers and creamy texture. It’s sure to impress your guests!
Making this cake is easier than it looks. You’ll layer the sponge with mascarpone cream and finish it off with a dusting of cocoa powder. It’s a fun project that can involve the whole family. Plus, it’s a great way to enjoy the flavors of Christmas in a unique way.
Ingredients
- 1 cup strong brewed coffee, cooled
- 1/2 cup coffee liqueur (optional)
- 4 large eggs, separated
- 1/2 cup granulated sugar
- 1 cup mascarpone cheese
- 1 cup heavy cream
- 1 teaspoon vanilla extract
- 1 package ladyfinger cookies
- Cocoa powder for dusting
Instructions
- Prepare the Coffee Mixture: In a bowl, combine the brewed coffee and coffee liqueur. Set aside.
- Make the Cream: In a separate bowl, beat the egg yolks and sugar until pale. Add the mascarpone and mix until smooth. In another bowl, whip the heavy cream and vanilla until stiff peaks form. Gently fold the whipped cream into the mascarpone mixture.
- Assemble the Cake: Quickly dip each ladyfinger into the coffee mixture and layer them in a dish. Spread half of the mascarpone cream over the ladyfingers. Repeat with another layer of dipped ladyfingers and the remaining cream.
- Chill: Cover and refrigerate for at least 4 hours, preferably overnight.
- Serve: Before serving, dust the top with cocoa powder. Slice and enjoy your Tiramisu Christmas Cake!
Peanut Butter Cup Cake
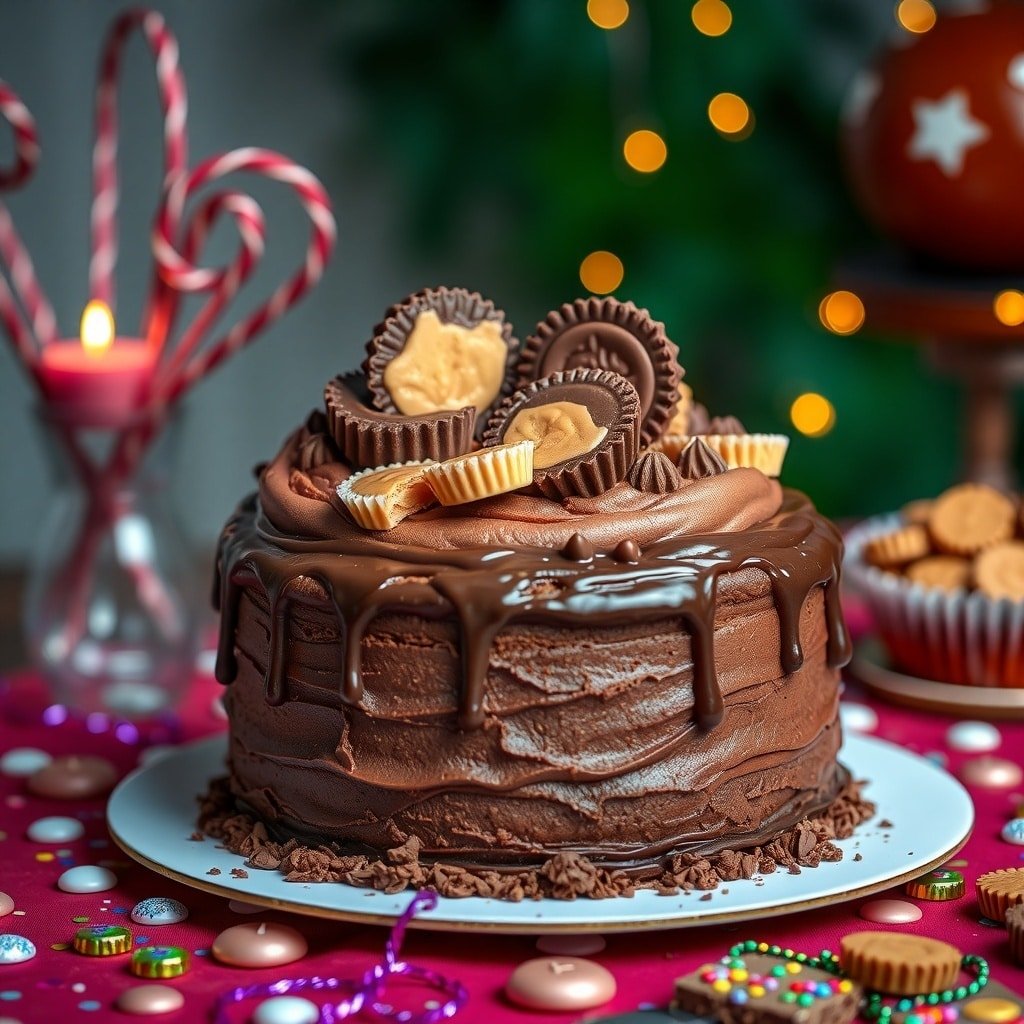
Peanut Butter Cup Cake is a delightful treat that brings together the rich flavors of chocolate and peanut butter. This cake is perfect for the holiday season, especially when you want to impress your guests with something special. The layers of moist chocolate cake are generously filled and topped with creamy peanut butter frosting, making it a standout among traditional Christmas cake designs.
The cake is adorned with mini peanut butter cups, adding a fun and festive touch. The combination of textures and flavors creates a dessert that is both satisfying and indulgent. It’s a great way to celebrate the holidays with a twist on classic flavors.
To make this cake, you’ll need simple ingredients that you might already have in your pantry. The process is straightforward, making it accessible for bakers of all levels. Let’s get into the recipe!
Ingredients
- 1 ¾ cups all-purpose flour
- 1 ¾ cups granulated sugar
- ¾ cup unsweetened cocoa powder
- 1 ½ teaspoons baking powder
- 1 ½ teaspoons baking soda
- 1 teaspoon salt
- 2 large eggs
- 1 cup whole milk
- ½ cup vegetable oil
- 2 teaspoons vanilla extract
- 1 cup boiling water
- 1 cup creamy peanut butter
- 1 cup powdered sugar
- ½ cup unsalted butter, softened
- 1 teaspoon vanilla extract (for frosting)
- Mini peanut butter cups for decoration
Instructions
- Preheat the oven to 350°F (175°C). Grease and flour two 9-inch round cake pans.
- In a large bowl, mix flour, sugar, cocoa powder, baking powder, baking soda, and salt.
- Add eggs, milk, oil, and vanilla to the dry ingredients. Beat on medium speed for 2 minutes. Stir in boiling water until well combined.
- Pour the batter evenly into the prepared pans. Bake for 30-35 minutes or until a toothpick inserted in the center comes out clean.
- Let the cakes cool in the pans for 10 minutes, then remove from pans to cool completely on wire racks.
- For the frosting, beat together peanut butter, powdered sugar, softened butter, and vanilla until smooth and creamy.
- Once the cakes are cool, spread frosting between the layers and on top of the cake. Decorate with mini peanut butter cups.
Pumpkin Spice Cake
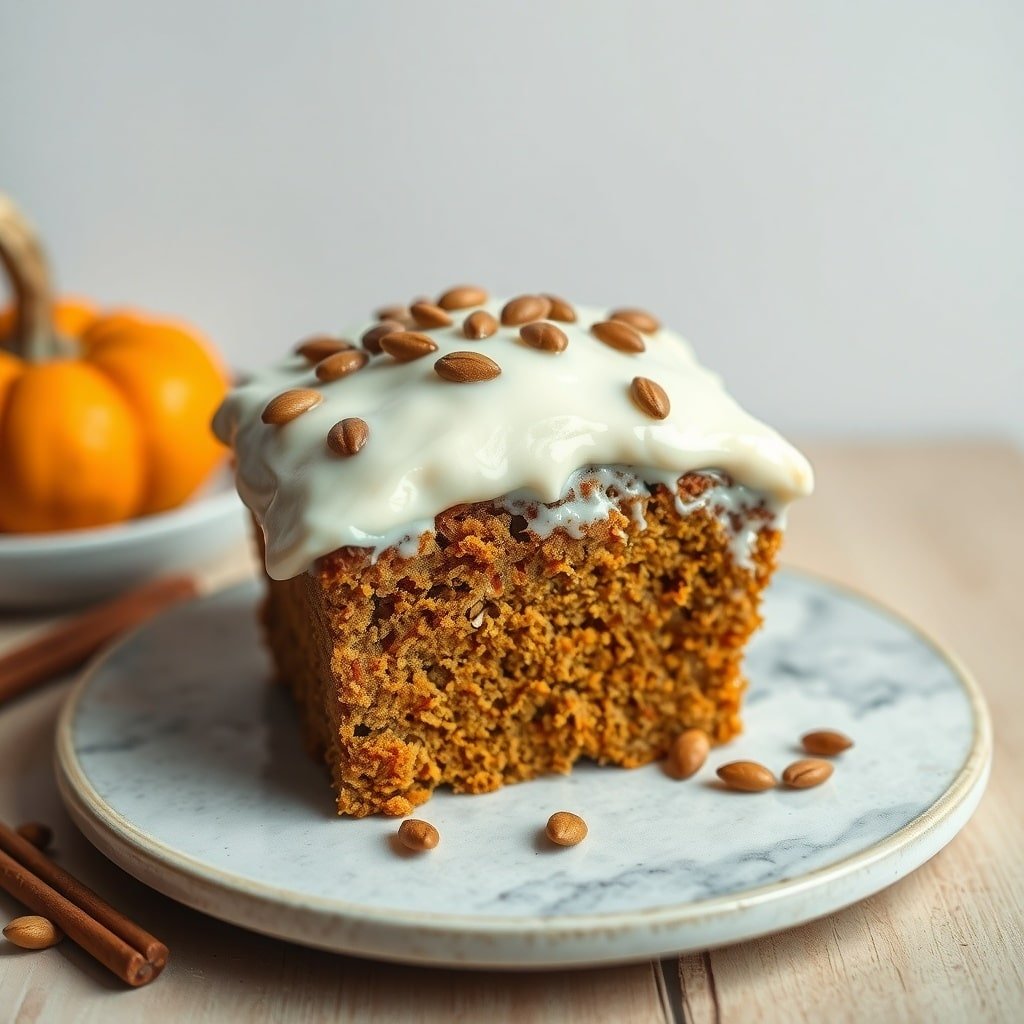
When the holiday season rolls around, pumpkin spice cake is a delightful treat that captures the essence of fall. This cake is moist, fluffy, and packed with warm spices like cinnamon and nutmeg. The image shows a beautifully frosted slice of pumpkin spice cake topped with pumpkin seeds, giving it a rustic charm. The soft, orange hue of the cake hints at its pumpkin base, making it a perfect addition to your Christmas cake designs.
To make this cake, you’ll need simple ingredients that are likely already in your pantry. The combination of pumpkin puree and spices creates a comforting flavor that pairs wonderfully with a cream cheese frosting. This cake is not just a dessert; it can be a centerpiece on your holiday table.
Ingredients
- 1 3/4 cups all-purpose flour
- 1 teaspoon baking powder
- 1 teaspoon baking soda
- 1 teaspoon ground cinnamon
- 1/2 teaspoon ground nutmeg
- 1/2 teaspoon salt
- 1 cup granulated sugar
- 1/2 cup brown sugar, packed
- 1 cup pumpkin puree
- 1/2 cup vegetable oil
- 3 large eggs
- 1 teaspoon vanilla extract
- 1 cup cream cheese, softened
- 2 cups powdered sugar
- 1 teaspoon vanilla extract (for frosting)
Instructions
- Preheat your oven to 350°F (175°C). Grease and flour a 9×13 inch baking pan.
- In a bowl, whisk together flour, baking powder, baking soda, cinnamon, nutmeg, and salt.
- In another bowl, mix granulated sugar, brown sugar, pumpkin puree, oil, eggs, and vanilla until smooth.
- Gradually add the dry ingredients to the wet mixture, stirring until just combined.
- Pour the batter into the prepared pan and bake for 30-35 minutes, or until a toothpick comes out clean.
- Let the cake cool completely before frosting.
- For the frosting, beat together cream cheese, powdered sugar, and vanilla until smooth. Spread over the cooled cake.
- Top with pumpkin seeds for a festive touch.
Winter Berry Cake
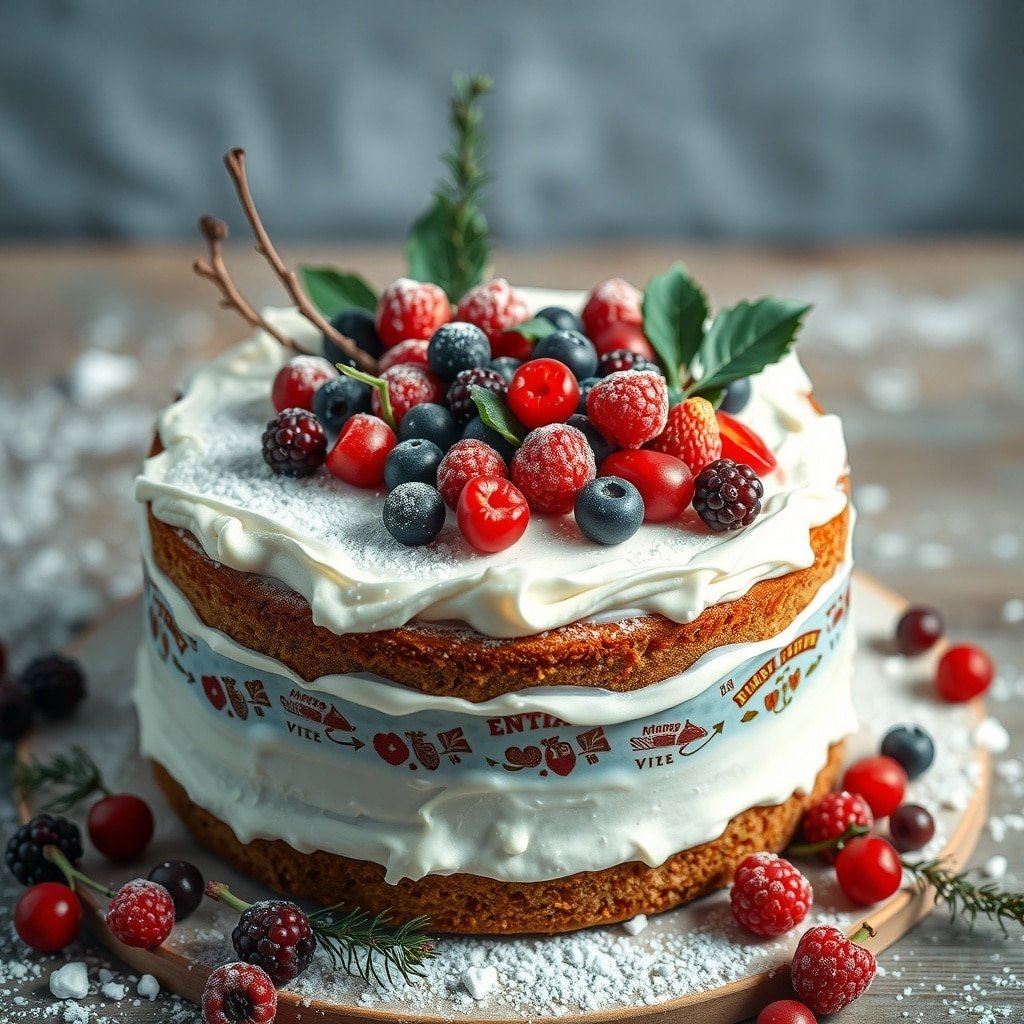
Winter Berry Cake is a delightful treat that captures the essence of the holiday season. This cake is not only visually stunning but also bursting with flavors that everyone will love. The combination of fresh berries and creamy frosting makes it a perfect centerpiece for any Christmas gathering.
The cake features layers of moist sponge, generously frosted with a smooth cream. Topped with an array of vibrant berries, it adds a festive touch to your dessert table. The contrast of the sweet frosting and the tartness of the berries creates a delicious balance that is hard to resist.
For those looking for unique Christmas Cake Ideas, this cake is a fantastic choice. It’s simple to make yet looks impressive, making it a great option for both novice and experienced bakers. Plus, it’s a wonderful way to incorporate seasonal flavors into your holiday celebrations.
Ingredients
- 2 cups all-purpose flour
- 1 ½ cups granulated sugar
- ½ cup unsalted butter, softened
- 1 cup milk
- 3 large eggs
- 2 teaspoons baking powder
- 1 teaspoon vanilla extract
- 1 cup heavy cream
- 2 cups mixed berries (strawberries, blueberries, raspberries, blackberries)
- Powdered sugar for dusting
Instructions
- Preheat your oven to 350°F (175°C). Grease and flour two 9-inch round cake pans.
- In a large bowl, cream together the butter and granulated sugar until light and fluffy. Add the eggs one at a time, mixing well after each addition.
- Stir in the vanilla extract. In another bowl, combine the flour and baking powder. Gradually add this to the butter mixture, alternating with milk. Mix until just combined.
- Divide the batter evenly between the prepared pans. Bake for 25-30 minutes, or until a toothpick inserted into the center comes out clean. Let the cakes cool in the pans for 10 minutes, then transfer to wire racks to cool completely.
- While the cakes are cooling, whip the heavy cream until soft peaks form. Once the cakes are cool, spread a layer of whipped cream on top of one cake layer, then add a layer of mixed berries. Place the second cake layer on top and frost the entire cake with the remaining whipped cream.
- Decorate the top with additional berries and dust with powdered sugar before serving.
Honey Almond Cake
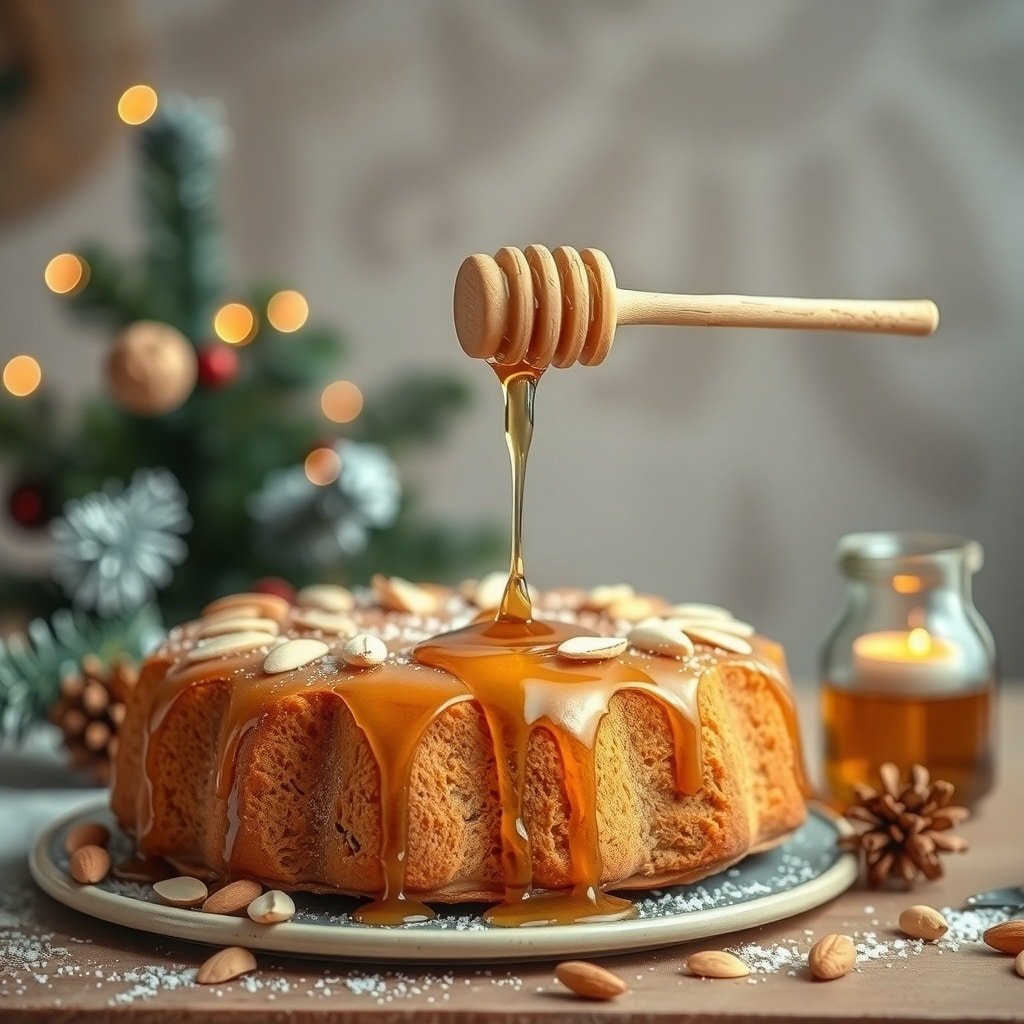
This Honey Almond Cake is a delightful treat for the holiday season. Its golden hue and rich texture make it a perfect centerpiece for your Christmas celebrations. The cake is drizzled with honey, adding a touch of sweetness that pairs beautifully with the nutty flavor of almonds. The background hints at a cozy holiday atmosphere, with a softly lit Christmas tree and festive decorations.
When you think of Christmas cake designs, this one stands out with its simple yet elegant presentation. The almonds sprinkled on top not only enhance the flavor but also add a lovely crunch. This cake is not just a dessert; it’s a warm hug on a plate, perfect for sharing with family and friends.
Ingredients
- 1 cup all-purpose flour
- 1/2 cup almond flour
- 1/2 cup granulated sugar
- 1/2 cup honey
- 1/2 cup unsalted butter, softened
- 3 large eggs
- 1 teaspoon baking powder
- 1/2 teaspoon vanilla extract
- 1/4 teaspoon salt
- 1/4 cup sliced almonds, for topping
Instructions
- Preheat the oven to 350°F (175°C). Grease a round cake pan.
- In a bowl, cream together the softened butter and sugar until light and fluffy. Add the honey and mix well.
- Beat in the eggs one at a time, then stir in the vanilla extract.
- In another bowl, combine the all-purpose flour, almond flour, baking powder, and salt.
- Gradually add the dry ingredients to the wet mixture, mixing until just combined.
- Pour the batter into the prepared cake pan and smooth the top. Sprinkle sliced almonds over the batter.
- Bake for 25-30 minutes, or until a toothpick inserted in the center comes out clean.
- Allow the cake to cool in the pan for 10 minutes before transferring it to a wire rack to cool completely.
- Once cooled, drizzle with extra honey for a beautiful finish.
Chocolate Mint Christmas Cake Ideas
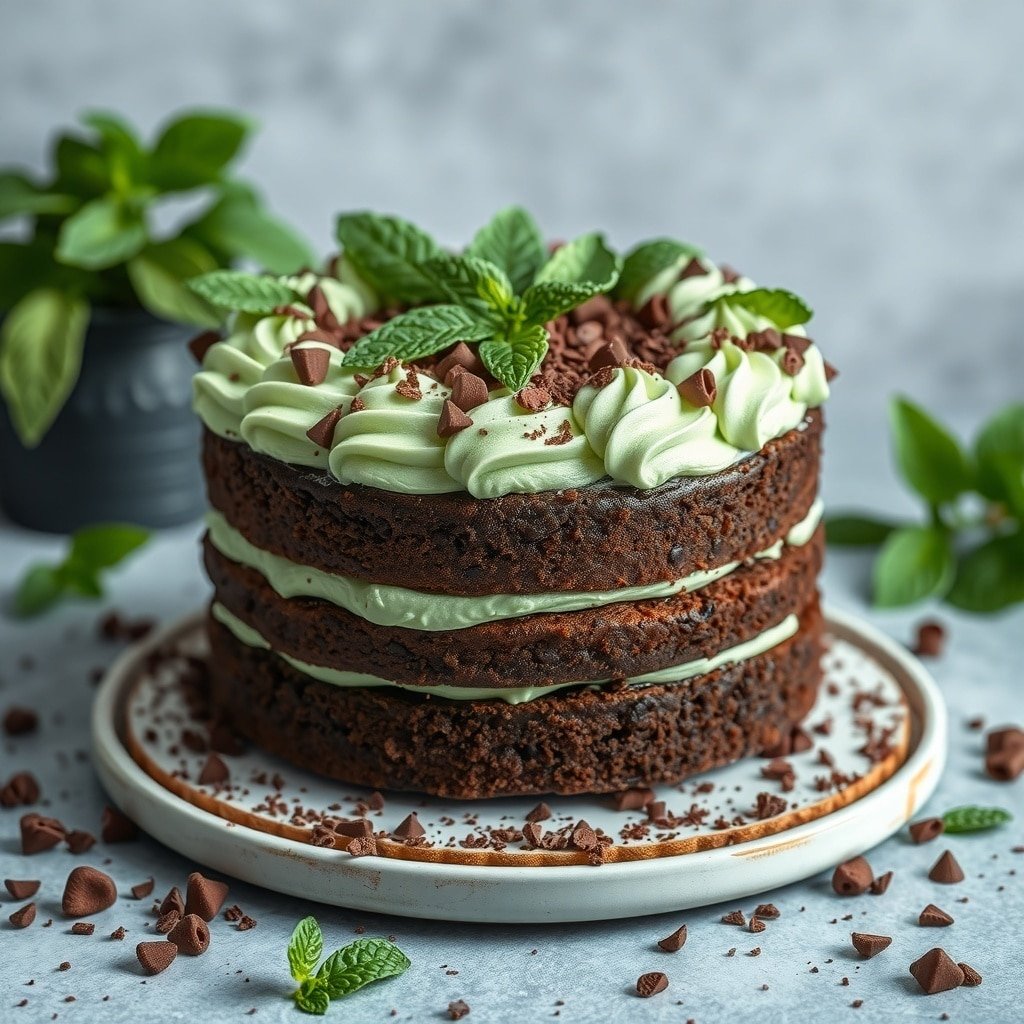
Chocolate mint cake is a delightful treat that perfectly captures the spirit of the holiday season. This cake features rich chocolate layers paired with a refreshing mint frosting, making it a standout choice among Christmas cake designs. The combination of flavors is not only festive but also comforting, ideal for gatherings with family and friends.
The cake is often decorated with mint leaves and chocolate shavings, adding a touch of elegance. The vibrant green of the mint frosting contrasts beautifully with the dark chocolate, creating a visually appealing dessert that will impress your guests.
Making this cake is easier than you might think. With simple ingredients and straightforward steps, you can whip up this festive dessert in no time. It’s a great way to bring a little cheer to your holiday table!
Ingredients
- 1 3/4 cups all-purpose flour
- 1 3/4 cups granulated sugar
- 3/4 cup unsweetened cocoa powder
- 1 1/2 teaspoons baking powder
- 1 1/2 teaspoons baking soda
- 1 teaspoon salt
- 2 large eggs
- 1 cup whole milk
- 1/2 cup vegetable oil
- 2 teaspoons vanilla extract
- 1 cup boiling water
- 1 cup unsalted butter, softened
- 4 cups powdered sugar
- 1/4 cup heavy cream
- 1 teaspoon peppermint extract
- Chocolate shavings and mint leaves for decoration
Instructions
- Preheat your oven to 350°F (175°C). Grease and flour three 9-inch round cake pans.
- In a large bowl, combine flour, sugar, cocoa powder, baking powder, baking soda, and salt. Mix well.
- Add eggs, milk, oil, and vanilla to the dry ingredients. Beat on medium speed for 2 minutes. Stir in boiling water until well combined.
- Pour the batter evenly into the prepared pans. Bake for 30-35 minutes or until a toothpick inserted in the center comes out clean.
- Let the cakes cool in the pans for 10 minutes, then remove and cool completely on wire racks.
- For the frosting, beat the softened butter until creamy. Gradually add powdered sugar, heavy cream, and peppermint extract. Beat until fluffy.
- Once the cakes are cool, place one layer on a serving plate. Spread a layer of frosting on top, then repeat with the second layer. Place the third layer on top and frost the entire cake.
- Decorate with chocolate shavings and mint leaves. Slice and serve this festive chocolate mint cake at your holiday gatherings!
This post may contain affiliate links. Please see my disclosure policy for details.