Fall Entry Table Decor: How I Create a Stunning Seasonal Welcome Every Autumn
Contents
Fall entry table decor is the perfect way to greet guests with warmth and style the moment they step through your door.
I used to walk past my boring entry table every single day without giving it a second thought. Then one October, I stuck a single pumpkin on it and suddenly felt like my house actually knew what month it was. That’s when I realized how powerful a well-styled entry table can be.
Your entryway is prime real estate that most people completely waste. I’m going to show you exactly how I transform mine every fall without spending a fortune or needing a design degree.
Why Your Entry Table Matters More Than You Think
The entry table is literally the first thing people see when they walk into your home. It sets the mood for everything else. A cluttered mess of keys and junk mail says “we gave up,” but a thoughtfully styled surface says “we’ve got our act together and we know it’s fall.”
I’ve styled mine probably twenty different ways over the years, from minimalist modern to full-on farmhouse chaos. The beauty of fall decorating is that you can’t really mess it up if you follow a few simple rules.

💡 Steal This Look
- Paint Color: Benjamin Moore Kendall Charcoal HC-166
- Furniture: narrow 36-inch console table with single drawer for hidden storage
- Lighting: antique brass swing-arm wall sconce with fabric shade
- Materials: reclaimed wood, hammered metal, chunky knit textiles, dried botanicals
I’ve learned the hard way that an entry table without a drawer becomes a dumping ground by Wednesday, so now I always prioritize one piece of concealed storage even in the tiniest foyers.
The Foundation: Picking Your Color Story
Fall entry table decor starts with choosing your palette, and this matters more than anything else you’ll do.
I’ve done it both ways—the traditional orange-and-rust explosion and the more sophisticated neutral approach. Both work, but you need to commit to one.
Traditional Fall Colors
- Deep burnt orange
- Rich burgundy
- Golden amber
- Chocolate brown
- Olive green
Modern Neutral Approach
- Cream and ivory
- Soft sage green
- Warm taupe
- Natural wood tones
- Touches of copper or brass
Pick three to four colors max and stick with them religiously. I learned this the hard way after creating what looked like a craft store threw up on my table.
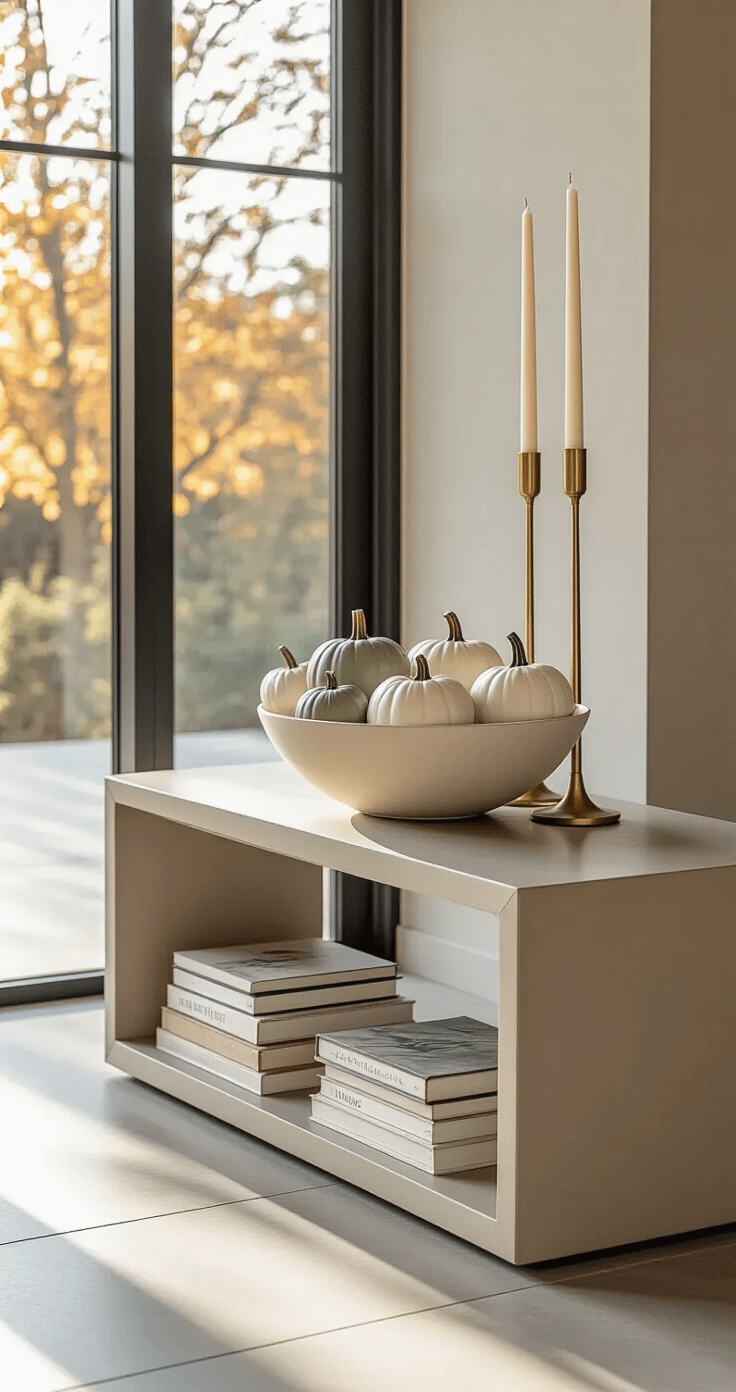
🎨 Steal This Look
- Paint Color: use Farrow & Ball brand. Match the ACTUAL wall color in the image. Format: Farrow & Ball ColorName CODE
- Furniture: narrow console table with tapered legs in warm walnut or aged oak finish, approximately 36-48 inches wide
- Lighting: brass or copper table lamp with linen drum shade, 24-28 inches tall
- Materials: matte ceramic vases, woven seagrass or jute runners, hammered metal trays, dried botanical stems, chunky knit or wool textiles
I’ve stood in my entryway at 11 PM rearranging pumpkins because I broke my own rule—commit to your palette before you shop, not after you’ve already bought the wrong shade of amber.
What You Actually Need (And What You Don’t)
Let me save you from buying stuff that’ll sit in your garage for eleven months.
The Non-Negotiables:
- A decorative tray or bowl for corralling smaller items
- Some type of height element (vase, candlesticks, or stacked books)
- Natural elements (pumpkins, leaves, pinecones)
- One statement piece that draws the eye
- A fall scented candle because your entry should smell like fall too
Nice to Have But Not Essential:
- A table runner in fall colors
- Fresh or faux florals
- Decorative signs or typography art
- Textured elements like a woven basket
Skip These Entirely:
- Those giant letter boards with inspirational quotes (overdone)
- Anything glittery (this isn’t Christmas)
- More than three real pumpkins (they rot, trust me)
My Step-by-Step Styling Process
I’ve refined this over years of trial and error, so you don’t have to figure it out yourself.
Step 1: Clear Everything Off
Start with a completely blank slate. Every single thing comes off the table. I mean it—even that lamp you think is permanent.
Step 2: Add Your Base Layer
If you’re using a table runner, lay it down first. I prefer letting my wood table show on the sides, so I position the runner down the center.
A woven or textured table runner in a neutral tone gives you flexibility with your accent colors.
Step 3: Create Height Variation
This is where most people fail. Everything ends up the same height and looks flat.
I use the rule of threes with different heights:
- Tall element (18-24 inches): A vase with branches or tall candlesticks
- Medium element (10-14 inches): A stack of books or medium-sized pumpkin
- Low element (4-8 inches): A bowl with smaller items or squat candles
Position these at different points along your table, not in a straight line.
Step 4: Add Your Statement Piece
Pick one item that’s the star of the show.
For me, it’s usually a gorgeous ceramic or glass vase filled with seasonal stems—eucalyptus, magnolia leaves, or fall branches from my own yard.
Don’t overthink this. The statement piece should be the first thing you notice but not so loud that it fights with everything else.
Step 5: Layer in Natural Elements
Now the fun part—adding those cozy fall touches.
I grab a wooden dough bowl (or any rustic bowl) and fill it with:
- Small white pumpkins
- Pine cones
- Acorns
- Maybe a gourd or two
The key is grouping items in odd numbers (3, 5, or 7 items look better than even numbers).
Step 6: Fill the Gaps
Stand back and look for awkward empty spaces. This is where you add smaller filler items:
- A small candle
- A decorative object
- A tiny potted succulent
- A piece of driftwood
Don’t fill every single gap though. Negative space is your friend.
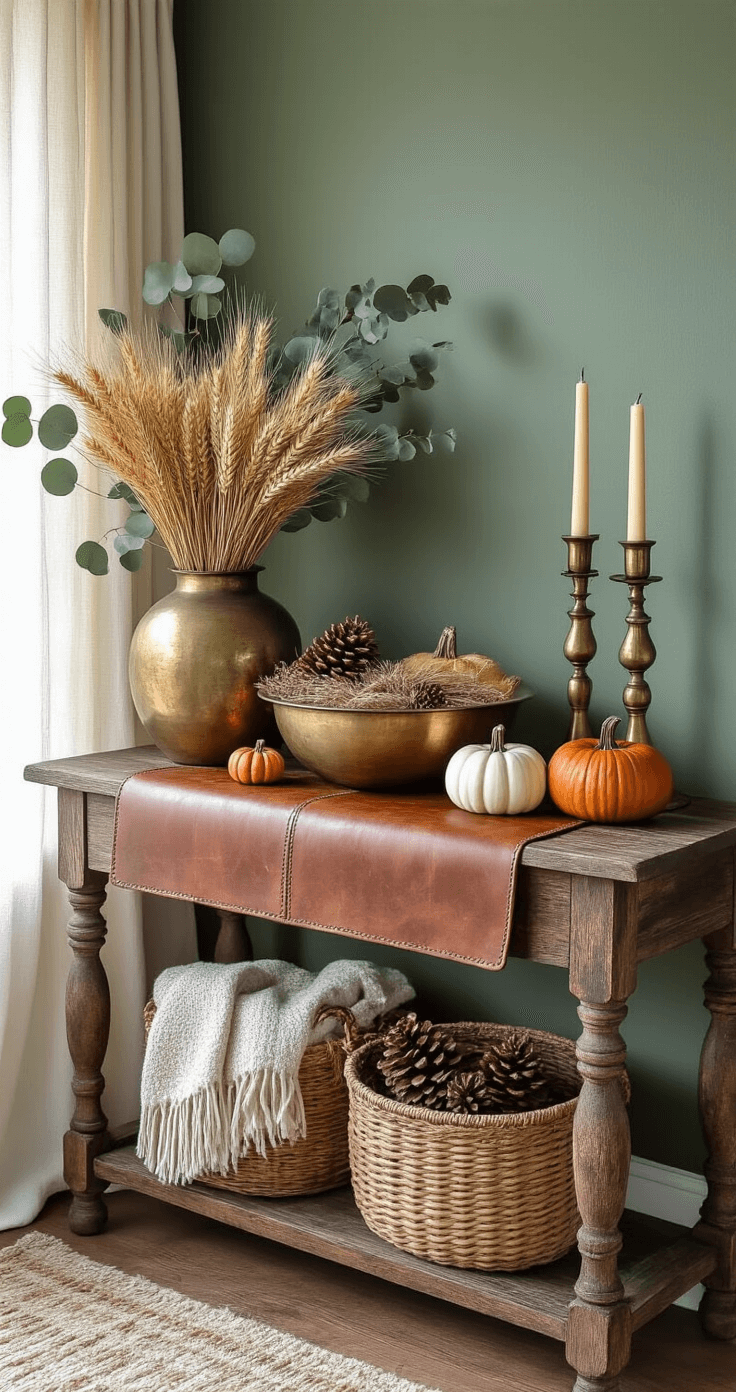
✎ Steal This Look
- Paint Color: use Valspar brand. Match the ACTUAL wall color in the image. Format: Valspar ColorName CODE
- Furniture: narrow console table with tapered legs, 48-60 inches long, in warm oak or blackened wood finish
- Lighting: slim profile table lamp with linen drum shade, 24-28 inches tall
- Materials: woven jute or sisal runner, aged brass, matte ceramic, dried botanicals, distressed wood
This is the process I return to every September when I’m itching to reset my entry—there’s something almost meditative about stripping it all back and building fresh layers that welcome you home differently each season.
✅ Get The Look
Styling Approaches That Actually Work
I’ve tested countless arrangements, and these three approaches never fail.
The Symmetrical Look
Place matching items on each end of the table with a centered statement piece. This works great if your entry is formal or if you have matching lamps that need to stay.
Layout:
- Tall candlesticks on both ends
- Central vase with fall stems
- Small pumpkins flanking the vase
- Books stacked under one candlestick
This post may contain affiliate links. Please see my disclosure policy for details.